 |
| Contour Line Portrait Drawing |
Miss Arty Pants
A Glimpse Into Mrs. Heath's Art Room- a place to share creative ideas and art lessons!
Friday, May 4, 2018
Contour Line
This is just a stunning example of contour line. One of my 7th Graders drew this to fulfill one of her sketchbook assignments (they have to choose and complete 3 from a list of 25 options throughout the trimester). The assignment drawn here was: Draw a face using only one line. I think we can all agree, she nailed it!
Labels:
Contour Line,
Drawing,
Middle School Art,
Portrait,
Sketchbook
Friday, April 13, 2018
'About Me' Creativity Cards
 |
| Ummm...can you check out that adorable sloth? |
This lesson evolved after I saw a photo online of mini artists' cards folded and overlapping one another so that they were popping off the page. I loved it so I took the concept and personalized it for my students. I have my 7th graders make ten cards (though I allow them to only include 9 in their final layout if they wish). They are asked to make one 'name' card, two 'symbol' cards to represent themselves and their interests, two 'word/quote cards', two 'design/pattern' cards, and three 'free choice' cards. I have a few requirements of each of those cards but then I let them decide their layout. I let them use colored pencils and markers, or just one or the other, I just encourage the maintenance of unity and flow between all of the cards. Now for the good stuff...Finished Art:
Labels:
7th Grade Art,
Drawing,
Middle School Art,
Symbolism Art,
Variety,
Writing Art
Tuesday, April 3, 2018
Clay Excitement
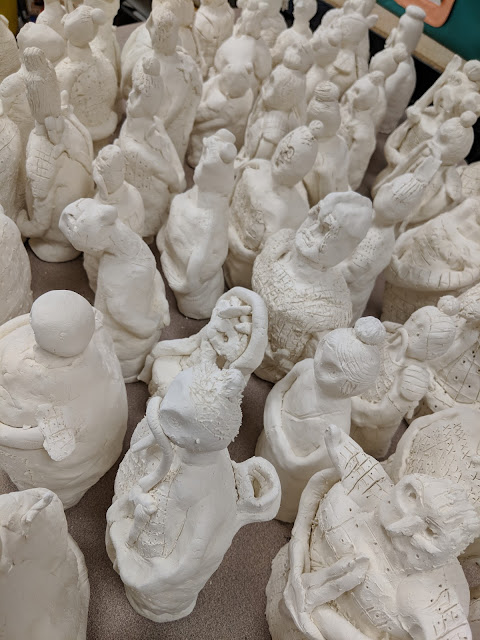
I can't wait to put these babies in the kiln! These are 7th grade creations. I ask that my 7th graders create hollow forms from pinch pots and transform them into their own works with a minimum of two attachments. I remind them that I'm focused on them practicing their hand building skills, especially their score and slip techniques. I want them to be creative in their art making while building on and practicing their clay skills. I can't wait to get them glazed! But for now, here is a sneak peak of a few greenware items:
Labels:
3D,
7th Grade Art,
Ceramics,
Clay Art Projects,
Clay Figures,
Middle School Art,
Pinch Pots
Wednesday, March 21, 2018
Plaster Masks
 |
| Fox Inspired Mask |
For the actual creation of the masks, I allow the students to make a choice. They can 1)use a face mold to build their mask (using plaster strips and water) on top of or 2) drape their face-or a volunteer friend's face-with a strip of saran wrap so as not to cover the nose (we have to breath) and they can build their mask on their friend's actual face or draw out a plan and have their friend build it on their face for them. Either way, each student has to create a mask. It is just up to them how messy they want to get and how much they trust their friends with plaster! Option two requires students to work a little faster since both friends need time to build a mask, but so far that hasn't been a problem. The next time I see the kiddos (this is a 2 class period project), their masks have dried and hardened and are ready to be painted and adorned. I let the students paint and decorate their masks however they would like. I help the students hot glue the feathers on but otherwise, it is all up to them. I never seem to remember to take enough photos but here are a few that I can brag about (and give you the general idea from)
Labels:
3D,
5th Grade Art,
Fifth Grade Art,
Plaster Sculpture,
Sculpture
Terra Cotta Warriors
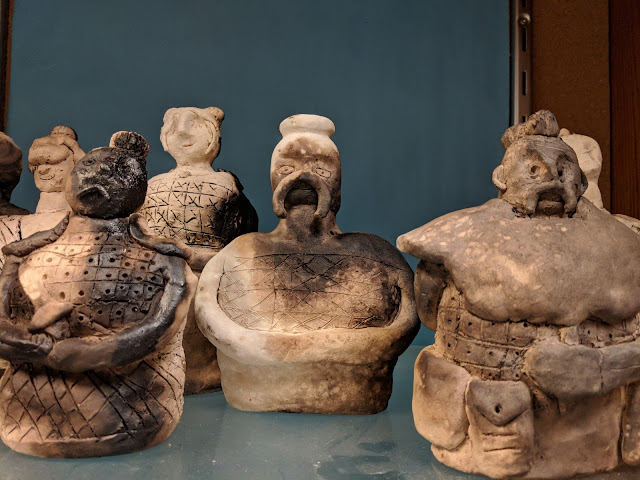
Artwork inspired by the Chinese Terra Cotta Warriors:
The latest and greatest Terra Cotta Warriors! For a detailed description of the lesson and process, check out previous posts here and here and here. However, one thing I have changed about my teaching is due to some new technology I have at my disposal. I have a SMART TV in my classroom--think giant television sized tablet. The TV is amazing and I love that it has replaced my projector. One of the main things I love about it is that I don't have to have the lights off to see what is on the screen. This is my favorite feature because I can make demonstration videos and loop them so that they play non stop during work time. This has been a tremendous help, because all teachers know that it is difficult being the one expert in a room of 25-30 curious, learning minds. The looping videos allow me to work one on one with those struggling while a lot of those that simply forgot what step comes next or how to do something can glance up at the screen and watch to see what it was that they need to do. I can't tell you how helpful this is! Such a time saver and the kids love it so that they don't all have to wait for me to make it through the sea of raised hands to get to their "quick question."
Bisqueware:
Post Smoke Firing:
 |
| Checkout that crossbow! |
 |
| This student had no idea who Charlie Chaplin is/was but he totally created a Charlie Chaplin Warrior! Love that he even gave it a bowler hat and cane! |
Labels:
6th Grade Art,
Art History,
Ceramics,
China,
Clay Art Projects,
Clay Figures,
Cross Curricular Lesson,
Terra Cotta Warriors
Micrography
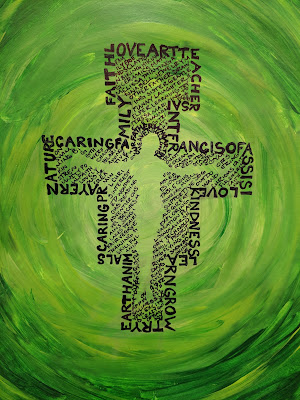 |
| I teach at Saint Francis of Assisi School and the San Domiano Cross is a part of our logo, so I used it as my example |
New vocab and new lesson for this lady! While I've been familiar with the art style for awhile, I had no idea it was called "micrography." I wanted to try something new with my 6th graders so I tried micrography and loved it!
We began by learning about micrography and what it is. Then we discussed symbolism. I asked students to choose symbols that represented themselves and their interests; this symbol would be the image we used in the creation of our micrography. Students were also allowed to create a self portrait in this style, though none of them took me up on this offer. I also had the students write a list of 40 things about themselves and their interests in their sketchbook. The list could be specific (names of people we care about, favorite movies/music, etc) and/or vague (general likes).
Finally, we got our hands dirty! We started with learning about paint mixing, shades, tints, and hues of colors. We then put this knowledge to use by painting a background. I asked my 6th graders to demonstrate the creation of at least three hues of their chosen color for their background. I encouraged lighter colors so that the markers they would be using for the micrography would show up better but ultimately left that decision up to the students themselves. They could paint their background however they'd like (my example above, is done more circularly) as long as the hues transitioned smoothly (no blatant stripes).
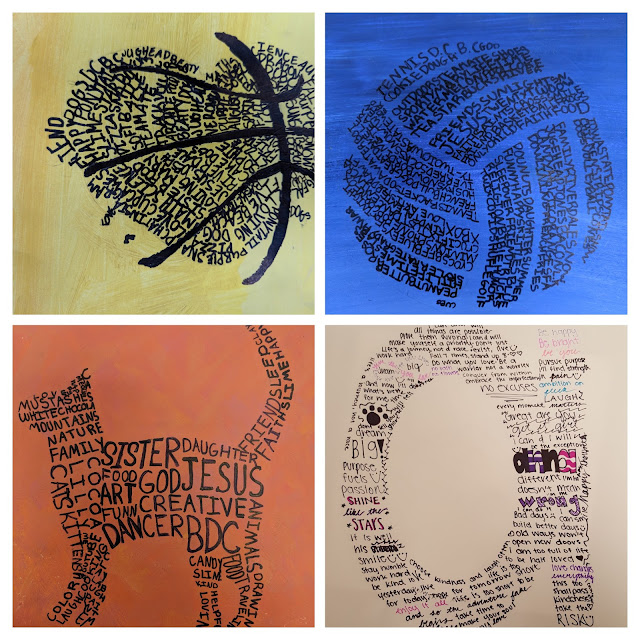
After we painted our backgrounds I allowed students to find an image/symbol online that represented themselves and print it off. Normally I don't allow tracing in my classroom, but this time I made an exception; though it could easily be done without the tracing steps, it would just take up more class time. I had the students trace their symbol's outline/silhouette onto a sheet of tracing paper. We laid the tracing face down onto our background painting and with a little pressure from our pencils, transferred the image into our background lightly. We put our written "about me" list to good use and filled our silhouettes. I encouraged playing with font, font size, and font thickness to define different details of our images. I made sure to repeat (many times) that it wasn't important if a word had to be broken up to define a space, the symbolism is in the intent and visual as a whole, not whether or not a single word is written as it would be in our normal day to day writing. While some students struggled to understand how to fill "edge to edge" most of them did an amazing job and created some beautiful pieces of artwork!
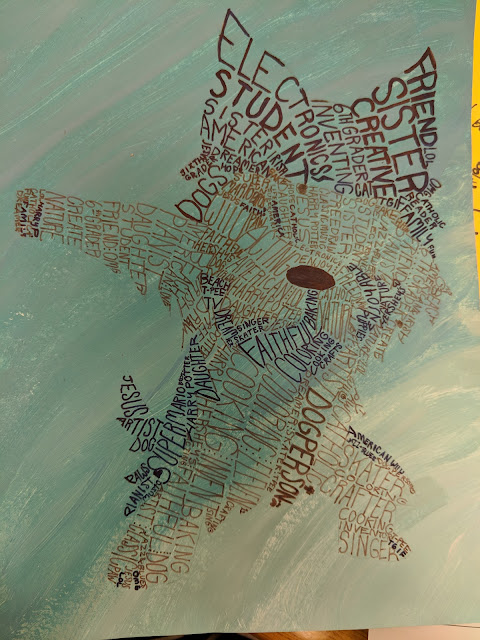 |
| I just love this dabbing puppy! |
Labels:
6th Grade Art,
Micrography,
Middle School Art,
Painting,
Text as Art,
Writing,
Writing Art
Subscribe to:
Posts (Atom)


