Thursday, October 31, 2013

Day of the Dead Dioramas

I started introducing the lesson showing a slideshow of various Day of the Dead dioramas and we talked about what we saw.  We discussed what an assemblage piece can look like but I stressed that the possibilities were endless.  I explained what our process would be and left it very open ended.  Students were allowed to partner up into groups or work alone.  Each student (regardless if they worked alone or in a group) needed to create at least one skeleton from clay, everyone needed a theme and to include various details (requirements varied based on how many students worked on each diorama) keeping in with the Day of the Dead theme.  All words were supposed to be in Spanish and there were to be various three-dimensional elements from mixed media.

We started making our skeletons out of air dry clay (I would use model magic in the future) so they would have time to dry before we painted them and we could work on our boxes while we had to wait that out.  The 7th graders are a bit big to gather around one small table for a demonstration, so I've started making these demo videos to play for them...it's so much easier for them to see this on the projector.  This video is simply about forming a skeleton shape from clay and how to give them facial expressions

Last but not least, as I promised in my previous post here, these are a few of the photos from our 7th Grade Day of the Dead Dioramas.    The photos don't do them justice!  The students did a great job transforming their boxes into dioramas!

Day of the Dead Diorama with Clay and Shoe Box Middle School Art Lesson
Percy Jackson Scene

Day of the Dead Diorama with Clay and Shoe Box Middle School Art Lesson
View of the skeletons in the Percy Jackson scene

Day of the Dead Diorama with Clay and Shoe Box Middle School Art Lesson
Wedding

Day of the Dead Diorama with Clay and Shoe Box Middle School Art Lesson
Love Beach

Day of the Dead Diorama with Clay and Shoe Box Middle School Art Lesson
The Proposal (with fountain that actually holds water and drips down from each tier)

Day of the Dead Diorama with Clay and Shoe Box Middle School Art Lesson
Mariachi Band

Day of the Dead Diorama with Clay and Shoe Box Middle School Art Lesson
'Mi Taco Es Su Taco' Taco Truck

Day of the Dead Diorama with Clay and Shoe Box Middle School Art Lesson
The Civil War with Abraham Lincoln

Day of the Dead Diorama with Clay and Shoe Box Middle School Art Lesson
Evel Knievel

Day of the Dead Diorama with Clay and Shoe Box Middle School Art Lesson
Dancers

Day of the Dead Diorama with Clay and Shoe Box Middle School Art Lesson
Cardinals Game

Day of the Dead Diorama with Clay and Shoe Box Middle School Art Lesson
Zoo

Day of the Dead Diorama with Clay and Shoe Box Middle School Art Lesson
Leisurely Reading with Owl in the Tree 


Thursday, October 24, 2013

Stained Glass Windows

The Art of Stained Glass...kind of

4th Grade Stained Glass with Glue Resist and Chalk Pastels

I started talking with my fourth graders about the characteristics of stained glass.  They were able to make a pretty extensive list describing what it tends to look like and how they would describe it to someone who has never seen stained glass windows.  I teach at a Catholic school, so we also talked about the religious elements that can be used in stained glass and what kinds of subject matter we see portrayed.
4th Grade Stained Glass with Glue Resist and Chalk Pastels

I shared a PowerPoint with my students of various examples and the students pointed out all of the things they saw on our list we had made while we went through it.  Once we had a grasp on what it was and all that it entailed, the students brainstormed and idea for their own stained glass artwork.  They sketched out their plans (if you have a class set of dry erase boards, I recommend using those b/c the kids LOVE them--otherwise have them sketch it on some scratch paper).  I encouraged them to break up their backgrounds into smaller pieces, just like stained glass.
4th Grade Stained Glass with Glue Resist and Chalk Pastels

We transferred our design onto black construction paper in pencil.  Then we traced over our pencil with glue.  We talked about how the glue will dry clear over the black paper and leave that solder look to our stained glass.  We let the glue dry and used chalk pastels to color them in.  The chalk wipes right off of the glue, so it leaves those areas black.  They look stunning!
4th Grade Stained Glass with Glue Resist and Chalk Pastels

4th Grade Stained Glass with Glue Resist and Chalk Pastels


4th Grade Stained Glass with Glue Resist and Chalk Pastels

4th Grade Stained Glass with Glue Resist and Chalk Pastels

4th Grade Stained Glass with Glue Resist and Chalk Pastels Art Lesson


Thursday, October 17, 2013

Native American Inspired Instruments

(Native American) Music to My Ears

7th Grade Native American Inspired Musical Instruments

This time I teamed up with one of our amazing music teachers!  She is currently teaching our 7th graders about Native American music.  They are learning about and creating their own Native American inspired chants in her room, and in my room, they created their own instruments to use along with those chants.  We started by talking about the instruments, what they look like and what they how they were traditionally used.  My students then used recycled objects such as paper towel rolls, water bottles, etc to create their objects.  We discussed how we were using recyclables since a big part of the Native American culture was not being wasteful.
7th Grade Native American Inspired Musical Instruments

The students were asked to incorporate at least four different media, Native American symbolism (they were given a hand out full of symbols) and should resemble the instrument in shape/form and concept.  They had free reign over a variety of art materials and I loved to see the variety of work the kids came up with.  We filled the rain sticks and rattles with rice and did our best to stretch fabric over the homemade drums. Everything came out looking (and sounding) great!

7th Grade Native American Inspired Musical Instruments


Dia de los Muertos

Day of the Dead Ofrenda

Fourth Grade Day of the Dead Foam Printing Skulls

It's that time of year again, time for the skeletons to dance and skulls to be adorned!  Day of the Dead (actually two days) is on November 1st and 2nd, so Mrs. Grabau (K-3 Art) and I have teamed up with Mrs. Buckmiller, our Spanish teacher to create a Dia de los Muertos ofrenda with our students!

An ofrenda is simply an offering table where you can create a colorful display to honor and celebrate the life of dead loved ones.  Traditional decorations include skeletons (known as calacas), skulls (the kids beg to do sugar skulls but I am not ready to take that on), decorative paper flags (papel picado) as well as photos of who the ofrenda is for and some of their favorite foods and/or objects.  Each grade level contributed to the ofrenda and it looks outstanding! 
School Day of the Dead Ofrenda


With my fourth grade students, I created skull prints using scratch foam.  They started by sketching out their skulls in simple shapes and then filling them with decorative lines and shapes as well as addressing the background.  We traced over our sketch with a sheet of foam underneath it to transfer the idea.  Then removed the sheet of paper and traced over it directly on the foam to really make sure the various shapes and lines were indented.  The students got to choose what color of ink they wanted to print with and on what color of paper.  As you can see, they are beautiful and so creative!
Fourth Grade Day of the Dead Foam Printing Skulls


My fifth graders created papel picado.  We talked about symmetry and how to cut our symmetrical shapes from paper.  For this particular activity, I gave my students four templates to choose from.  Three of which I drew up based on other ideas I had seen before and one of them was found here but later I also found these ones too.  I divided up the templates into three categories--easy, medium and hard.  I let my students select their own ability level, though when the students who chose 'easy' finished early, I asked them to try a 'medium.'  They simply folded a sheet of paper (their color choice) inside of the template and cut along the lines.  They were all pretty pleased with their work and were surprised at how challenging it was to cut out some of the pieces.  I love how they look all together!
Fifth Grade Papel Picado Templates

Fifth Grade Papel Picado

My seventh graders did a couple of things for the ofrenda.  For the entire month of October (and even at the end of September I think), whenever they finished an assignment early, I asked them to paint on some bones.  Though they aren't ordinary bones, they are milk jug bones!  I have seen milk jug skeletons around for quite awhile but had never made one myself.  So I decided that as students finished up early, they would paint on a part of the skeleton in honor of Day of the Dead.  I simply reminded them of the holiday, it's purpose and how it is a bright and colorful holiday.  I encouraged them to layer paints and designs (yes, you are actually supposed to paint on top of someone else's painting this time!) and to play with color.  I couldn't be happier with how they turned out!  Once we finished assembling the first one, he was dubbed Senior Huesos (Mr. Bones) and he graced our presence in the art room until the ofrenda was assembled.   We have a few others in the works, but so far Senior Huesos is repping the ofrenda alone.  But I gotta say, Day of the Dead milk jug skeletons are the way to go!

Day of the Dead Milk Jug Skeleton


My seventh graders also took on an assignment which satisfied a personal obsession.  They made Day of the Dead dioramas!  My absolute favorite booths at every art festival I attend, are Day of the Dead themed artwork with the boxes filled with elaborate scenes and details!  I just adore the tiny scenes and all of the colors melding together!  I shared this obsession with my students and some of them even agreed with me about how impressively cool they are.  I showed them a PowerPoint I created about them and we discussed their various qualities of each diorama.  We also discussed assemblage art and how they could use any number of items I had in the classroom as part of their scenes or bring in objects of their own.  The students then chose to work either alone or with a group (no more than 4 per group); however, I reminded them that with a group, I expected more detail and more elaborate scenes than those working alone.  We used air dry clay for our skeletons (in the future I will use model magic, as the air dry clay is brittle--it IS clay--and we keep losing limbs and will need lots of epoxy!) and a random assortment of materials for everything else!  I can't help but smile every time I think about this project.  While they aren't quite finished yet, they are simply amazing!  I will be sure to post photos as soon as they finish!
Middle School Day of the Dead Diorama Art Lesson

Friday, October 11, 2013

Wire Sculpture


The Wonderful World of Wire!

Middle School Wire Sculpture Art
Above are three different points of view of one of the finished sculptures.  This is a person riding a scooter.  The student originally made the scooter and decided, himself, to add the person for added interest

After teaching contour line, I took the opportunity to teach my 7th graders how to transform that contour line into a three-dimensional form through wire sculpture.  I absolutely love working three-dimensionally, so this is one of my favorite lessons, though a real challenge for the students because it calls on their problem solving skills (a lot).

We started out with some easy practice with Twisteez Wire (really easy to work with but not super stable, so I don't like to use it for our actual wire sculpture).  I gave each student four pieces of Twisteez Wire and let them start playing with it to get comfortable working with wire and 3-D but I warned them that everything we were making with this wire was going to be disassembled.  So we started off easy and I told them to just "make whatever you want."  I walked around as they worked to see how it was going and how was still working two-dimensionally and who's structures actually had depth.  Once their free choice sculpture was taken apart, I asked them to make a bug that was freestanding and three-dimensional.  This was a struggle for some, and a cake walk for others.  Other wire practice ideas that we did included "make a vehicle" and "make an animal."  In the past I have also had students make a cube and make a sphere to to make sure they understand the three dimensions.
Middle School Wire Sculpture Art
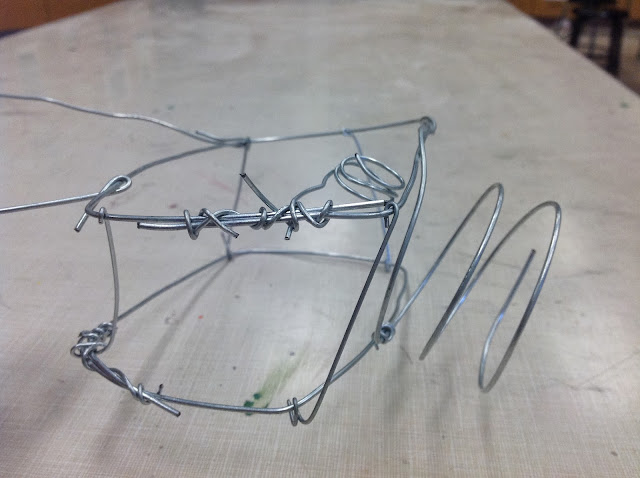
Glasses with Handlebar Mustache

I follow up the wire practice with a PowerPoint of examples from students in the past as well as professional artists who work with wire, just so they can see the potential of what wire can do.  When students went to plan their wire sculpture I asked that they create contour line sketches showing the front, side and back views of their sculpture.  I reminded them of contour line and how it is a continuous line or how all lines must connect in some way--this step will help a lot when they go to create their sculpture! Once I approve their sketches and give them pointers, I distribute their wire (we used 14 gauge picture hanging wire from a local hardware store), demonstrated a few techniques and they set to work.  Those who had created good contour line sketches, found their sculpture building a lot easier than those who ignored their sketch while working or rushed through their sketch to begin with.  I would really emphasize the importance of that sketch and contour line.

In the end, the sculptures came out great!  I only wish I had taken more photos to show off all of their hard work!  They had great problem solving skills in trying to figure out how to connect their pieces of wire and how to make things stay in place and/or be free standing.  There are a lot of creative minds in my classroom and it's fun to see them working!

Middle School Wire Sculpture Art
This student is a dancer and chose to make a pointe shoe
Middle School Wire Sculpture Art
View One of Wire Camera (don't you just want to pick it up and start snapping shots!?!)

Middle School Wire Sculpture Art
View Two of Wire Camera
Below are photos of a soccer scene four of my girls created as a group.  I just asked that each of them have a hand in the  3-D aspect when building each piece.  It is absolutely amazing!  I love their teamwork and creativity!
Middle School Wire Sculpture Art

Middle School Wire Sculpture Art

Middle School Wire Sculpture Art

Tuesday, October 1, 2013

Contour Line Drawings

Contour and Cross Contour Lines
Middle School Contour Line Drawing

I introduced my 7th graders to contour and cross contour lines.  As much as they love to draw outlines and coloring book style images (no shading, just hard black edges), this is a challenging lesson for them.  It is difficult to really draw what we see instead of an invented, cartoon version from our mind. 

To start with, I discussed with them what contour line is and how it doesn't actually exist in nature, only art.  Once we had our definition down, we moved on to the concept of hand-eye coordination and how many of them use that in sports and they've probably heard their coaches talk about it at practice(or foot-eye coordination for soccer players).  I explained that contour line is all about hand-eye coordination.  Your eye is tracing an invisible outline around an object and your hand is trying to follow along and mimic that outline.  We started with practice in our sketchbook and I had students draw their hands.  After a few practice drawings, we were ready for a larger drawing and more exciting subject matter.

I set out a variety of still life objects that I found somewhat interesting and knew would have good contour lines...and since I have a thing for dinosaurs, this was the perfect opportunity for me to share my mini collection with my students.  In the past, I've done this lesson with shoes, but I wanted to switch it up this year and I'm so glad that I did!  As much as the students told me that creating these contour lines was difficult, their drawings came out beautifully!  I love the playfulness of contour line and it lent very well to the subject matter we were working with!

A few of the still life objects I offered for this lesson...a few contour line drawings of them are found below

Middle School Contour Line Drawing

Middle School Contour Line Drawing

Middle School Contour Line Drawing

Middle School Contour Line Drawing

Middle School Contour Line Drawing

Middle School Contour Line Drawing

Middle School Contour Line Drawing

Middle School Contour Line Drawing


We also dabbled a little with cross contour line and did our hands again.    Students lightly traced their hand and part of their arm onto a plain sheet of paper.  They then added cross contour line with marker.  They drew horizontal straight lines for the background and every time they hit part of their arm or hand, they needed to make a "bump" to show the three dimensional qualities of our actual hands/arms.  A lot of the students told me they had seen this on Pinterest or somewhere else online but never knew how to do it and were pretty impressed with themselves

Cross Contour Line Drawing of a Hand
Crosss Contour Line/Hand Drawing