Showing posts with label All School Activity. Show all posts

Wednesday, March 21, 2018

Fly

As a "welcome back" project (I always like to star the year with something easy, personal and engaging--this year I also made it collaborative!)  I had every student in the school decorate a feather- this is just something I drew up and made photocopies of.  I had two versions of the feather--one that curved left and one that curved right

As you can see on my feather sheets, I had the kids include personal symbolism and goals for themselves for the year.  They could also add any other decorative drawings and designs they wanted to fill and finish off their feather

Once the feathers were complete, I assembled our wings and wrote "Fly" above the wings; inspired by Erin Hanson's gloriously famous poem that is frequently quoted around the world, "What if I fall?  Oh but my darling, what if you fly?"

I photographed each of my students in front of the wings and shared it with their families via Seesaw (this is an amazing app...are you familiar?  Ask me about it!  It's an amazing way to privately share images with parents and I often have the kids add to their seesaw account themselves, so it doesn't even take time out of my day to keep it updated).
Personal Symbolism Feathers into Wings
Wings, ready to be hung

Personal Symbolism Feathers into Wings
Me, taking them for a test fly--they were hanging outside of our office so that anyone could admire, be inspired by, and/or photograph themselves with them!

Friday, April 22, 2016

Christmas Collages

Advent Collage

6th grade Advent Christmas Collage from Black Friday Ads
Teaching at a Catholic school allows for me to integrate faith into art lessons.  While this post is LONG overdue, this is a lesson is great for Catholic school teachers during Advent.  

We start off by talking about Christmas and I ask the students to tell me what they think of when they think of "Christmas."   I let them list off their various thoughts and associations and then I ask them, what is the real meaning of Christmas?  Sometimes in my first round of 'thoughts' they mention their Catholic associations and other times it revolves around Santa and presents, so this follow up question steers them in the direction of the project a little more.  We discuss Christmas and Advent and then I talk to them about how we are going to make artwork about the real meaning of Christmas from something that often clouds our focus.  We are making collages portraying Christmas scenes using Black Friday advertisements.

I let the students pair themselves up into groups.  I allow them to choose how many people are in their group, but ask that it is between 2-5 people (but I recommend 3-4 for the ease of a convenient workload for all).  Each group finds an image that they want to work from online.  I let them use iPads to google search images and I suggest they add the words "coloring page" or "outline" or "clip art" so that a simplified image comes up.  We use Reflector (a program that connects the iPad to my computer/projector) to enlarge the image and I allow them to trace the image onto a sheet of posterboard.  Since this project is more about the meaning and materials, I don't make them free draw the image.  However, at one point our Reflector program wasn't working, so I did have the kids free draw their outlines based on the images they found online.  So really, it's your call how you want to teach this...you could even have them invent an image on their own!  I can usually get 2-3 of the groups images up on the Reflector at the same time, so it doesn't usually leave many people with down time.  And if there is a lot of down time I have the kids start collecting colors.

Anyone that is not tracing their image or once they are finished tracing their image, is collecting colors.  I tell the kids to decide what colors they will need and to start tearing up parts of the Black Friday ads and separating them by color.  I really emphasize that I shouldn't be seeing whole images, it is about the color, not the objects in the ads.  I also emphasize that they should avoid faces, as a face within a collage can be VERY distracting.  Which is why I tell them that any people in their finished collage, should not have an actual human face, glued where the collage face should be.  I give the groups envelopes to collect their colors in and to keep them separated.  Once they have collected "more than enough" of each color, I have them start gluing down the colors to fill in their poster.  In the end, we get amazing collages with a good, Christmas spirit!

6th grade Advent Christmas Collage from Black Friday Ads6th grade Advent Christmas Collage from Black Friday Ads


6th grade Advent Christmas Collage from Black Friday Ads6th grade Advent Christmas Collage from Black Friday Ads


6th grade Advent Christmas Collage from Black Friday Ads6th grade Advent Christmas Collage from Black Friday Ads


6th grade Advent Christmas Collage from Black Friday Ads6th grade Advent Christmas Collage from Black Friday Ads


6th grade Advent Christmas Collage from Black Friday Ads

6th grade Advent Christmas Collage from Black Friday Ads6th grade Advent Christmas Collage from Black Friday Ads


This is one of the commonly used images that my kids have traced.  You can see the various examples in the photos of how it became a collage (the last two finished collages both worked from this image)

Friday, January 22, 2016

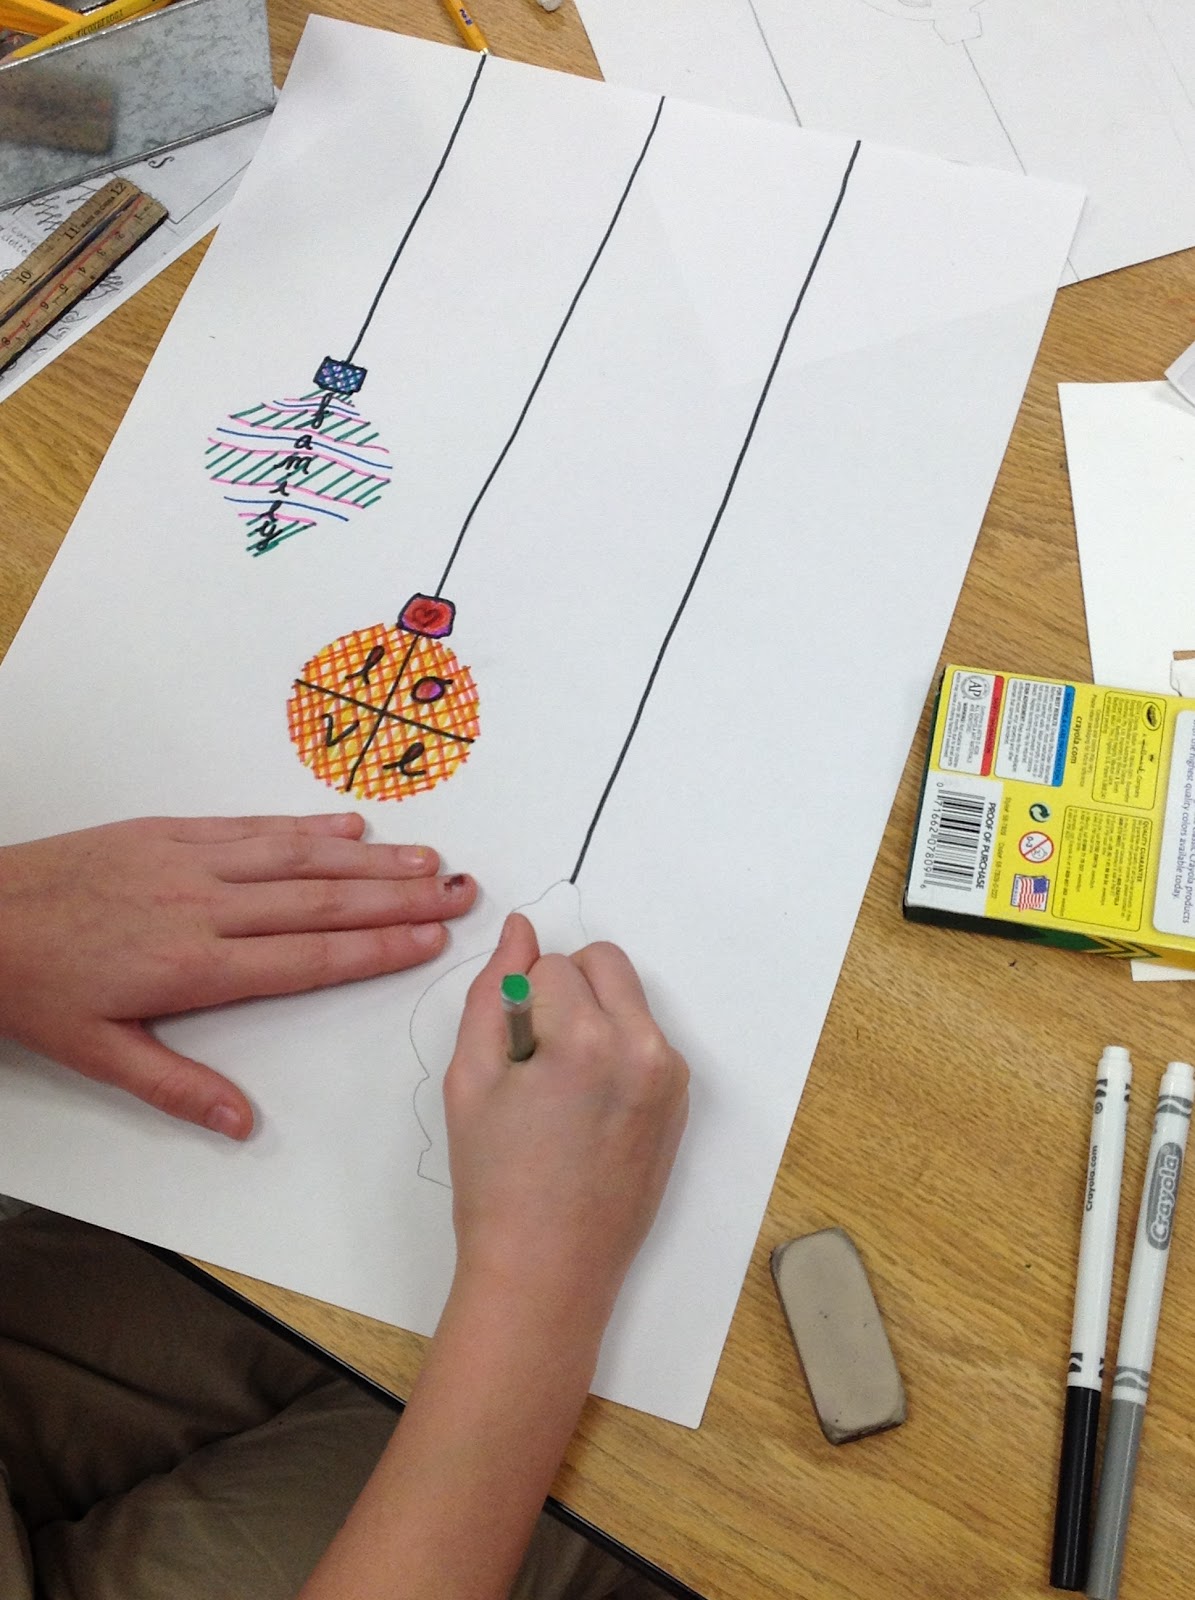
Line and Shape Design Ornaments

Merry Christmas to All, and to All a Good Art Lesson!

Fourth Grade Art Variety Negative Positive Space Design Christmas Ornaments
A lot of times I avoid doing holiday themed artwork with the kids, I feel like they do enough of that on their own and even a little in their classrooms.  But I really enjoy teaching this lesson and the kids really love it too, so this one usually makes the cut in my classroom.  

I start the lesson by asking my fourth graders what they think of when they think about Christmas.  I teach at a Catholic school, so I feel 100% comfortable asking this question to my kiddos.  After we've shared a pretty good list of associations, I show them a finished example of what we are going to make.  I ask them to tell me what they think we are going to do based on our introduction and the example they are seeing.  After a few (usually pretty accurate) guesses, I explain what our focus of the lesson is going to be.  Most of them have noticed the theme of patterns and designs and most of them have pointed out that there is a word within each ornament.  I address variety as well as positive and negative space with them because few students have noticed that none of my ornaments have outlines nor are they entirely colored in, yet we still can see the clear shape of each ornament.  

To keep it simple and since the focus for me on this project is line and shape designs as well as the use of negative space, I give them stencils to use that I have made myself from poster board.  Some of them are ornaments, some are in the shapes of trees, and some are crosses.  I also give them the option to free draw their own outlines.  I just encourage them to use "whisper lines" for their outline so that we can erase it at the end.  I ask the kids to choose one word (though I don't stop them if they use multiple) in each of their ornaments and to FILL the rest of their space with patterns and designs.  This lesson usually takes the kids 2 class periods (I have them for 55 minutes each class period), so for the first class period, I have them plan out their designs in pencil.  In the middle of the first class period or at the beginning of the 2nd class period, I share my "pattern and design cheat sheets" with them (these are just printed examples).  I still encourage them to make each pattern/design their own unique creation if they are using my cheat sheets for inspiration, but I still get a few copy cats.  They finish their designs off with skinny marks and erase their original outlines.  Some of the kids really struggle with the whole "no outline" and "not entirely colored in" concept, but I encourage them all to avoid these things.  If they want them to look like lights or ornaments, I show them how to free draw strings for them to hang from, otherwise they can be free floating shapes.  Okay, enough talking about the lesson, let's get to the good stuff!  More photos:
Fourth Grade Art Variety Negative Positive Space Design Christmas Ornaments

Fourth Grade Art Variety Negative Positive Space Design Christmas Ornaments

Fourth Grade Art Variety Negative Positive Space Design Christmas Ornaments

Fourth Grade Art Variety Negative Positive Space Design Christmas Ornaments

Fourth Grade Art Variety Negative Positive Space Design Christmas Ornaments

Fourth Grade Art Variety Negative Positive Space Design Christmas Ornaments

Fourth Grade Art Variety Negative Positive Space Design Christmas Ornaments

Fourth Grade Art Variety Negative Positive Space Design Christmas Ornaments

Fourth Grade Art Variety Negative Positive Space Design Christmas Ornaments

Fourth Grade Art Variety Negative Positive Space Design Christmas Ornaments

Fourth Grade Art Variety Negative Positive Space Design Christmas Ornaments

Fourth Grade Art Variety Negative Positive Space Design Christmas Ornaments

Fourth Grade Art Variety Pattern Design Negative Space Christmas Ornaments


Friday, October 23, 2015

PBIS Display

Positive Behavior Interventions and Support

Our school uses the PBIS system, which is essentially a system which focuses on the positive behaviors in students and rewarding those who are doing right (think "Caught you being good" type of thing).  At the beginning of the year we decided we needed to really reiterate our PBIS expectations among our students.  Yes, I said "at the beginning of the year."  I'm extremely behind on my blogging and updating of lesson plans on this thing...sorry!  

As the art teacher I wanted to create some nice visual reminders.  Also, I wanted to fill our beautiful but empty display case.  The PBIS principles that we focus on at our school revolve around the words "responsible, respectful, faithful and safe."  Personally, I associate those words with social justice causes, so I used one of my favorite social justice artists, Keith Haring to inspire the artwork I made for our display.  I made four large posters (one for each category), a handful of paper arrows, and a few foam core Keith Haring-esque figures.  I painted the posters to look like some famous Haring works.  I asked all of our teachers to write on the arrows various examples of what positive behaviors look like (I hung the arrows in the case and they spun, so I had them write on both sides) and I asked some students who were utilizing our before/after school care program to write examples on the foam core people.  And WAA-LA a beautiful display!  A beautiful display which I forgot to photograph, mind you.  I did manage to photograph all of the pieces after I took them down (once I realized that I didn't get a pic of the whole shabang).  So please try to imagine  all of these lovely little items hanging and standing in a lovely display case...
        PBIS Keith Haring Inspired Poster Display

PBIS Keith Haring Inspired Poster Display

                                      PBIS Keith Haring Inspired Poster Display

PBIS Keith Haring Inspired Poster Display

PBIS Keith Haring Inspired Poster Display

Tuesday, October 28, 2014

Day of the Dead Alter

Dia de los Muertos

Day of the Dead Alter Ofrenda Lesson Plan Dia De Los Muertos


Every year we set up a Day of the Dead alter as a school and make our ofrenda ("offering") for someone we have lost or a Mexican artist.  This year, we made our ofrenda for our school secretary, Jill, who lost her battle with cancer recently.  The kids made her paper symbols of the things that she loved (i.e. Nebraska Cornhuskers) and/or things they thought of when they thought of Jill and wrote her a note on the back of that symbol.  It was a great way for the kids to find closure in their sadness and to celebrate her life and the things that Jill loved.

This is a K-8 school and we (myself and Sara--the K-3 art teacher) try to get all of the grade levels involved.  This year the Kindergarten made papel picado and paper calavera masks, First Grade made candles from toilet paper rolls and tissue paper, Second Grade painted rocks as calavera, 4th-8th Grades made symbols for Jill as well as papel picado from patterns and Eighth Grade also made 3D calavera-paper sculls from a template found here on skulladay.blogspot.com.  The milk jug skeletons were actually created last year with my seventh graders but they were too great not to reuse!  Pictures of last year's display are on my blog here

Day of the Dead Alter Ofrenda Lesson Plan Dia De Los Muertos

Day of the Dead Alter Ofrenda Lesson Plan Dia De Los Muertos

Day of the Dead Alter Ofrenda Lesson Plan Dia De Los Muertos

Day of the Dead Alter Ofrenda Lesson Plan Dia De Los Muertos

Day of the Dead Alter Ofrenda Lesson Plan Dia De Los Muertos

Day of the Dead Alter Ofrenda Lesson Plan Dia De Los Muertos

Day of the Dead Alter Ofrenda Lesson Plan Dia De Los Muertos

Day of the Dead Alter Ofrenda Lesson Plan Dia De Los Muertos

Close Up of 8th Grade Calavera from Skulladay's Template:
3D Paper Skull Calavera Day of the Dead Art Lesson

Art Club Made and Decorated Sugar Skulls!
Art Club Sugar Skulls Activity

Art Club Sugar Skulls Activity

Art Club Sugar Skulls Activity


Thursday, October 16, 2014

Tree of Life

All School Art--The Tree of Life

Last year at the beginning of the year, I had my kids make a "get to know you" handelier (chandelier made of hands) with symbolism and construction paper--and it continues to hang in my classroom this year--I just loved doing that activity with so many grade levels.  So I wanted to start the year off with something similar, yet totally different.  The result was inspired by Gustav Klimt's tree of life and whichever art teachers' photos popped up when I googled "kid art Tree of Life."

I teach 4th-8th Grade Art and I only see each middle school level for one trimester, so this was done with 4th, 5th and 8th grades but could be done with any age.   Each student learned to use a safety compass (I love that they don't leave a hole in your paper and that your pencil won't fall out on you) and drew a circle.  I gave a circle size/measurement to the older kids and told the younger ones (4th and 5th graders) to make as big of a circle as they could on the paper I provided.  After looking at Gustav Klimt's Tree of Life, we talked about its symbolism and his style of art making.  I encouraged the kids to be inspired by his use of pattern and rhythm while drawing/coloring on their circle, but plenty of kids wanted to draw pictures that symbolized their own interests and that was fine by me.  I constructed a large tree (trunk and branches) from brown butcher/craft paper and hung it up in the school cafeteria along with all of the students' circles.  
Tree of Life Student Art with Circles
To the right of our tree there is a summary of what we did as well as a copy of Gustav Klimt's work.

Tree of Life Student Art with Circles