Tuesday, December 18, 2012

Toy Story in Windows Movie Maker

Toy Story with Windows Movie Maker

Students Use Writing and Photography to Create an Original Movie

Inspired by Disney's movie A Toy Story, I have created a digital photography lesson plan in which students must create their own toy tale/adventure and turn it into a short video.  After spending some time writing our stories (contact me if you'd like the full lesson plan) we plan our photographs.  Each page of text (written like a children's story so one page is only a few sentences long) needs to have one photograph to go along with it.  The students have a box of random objects and toys I provide or they can supply their own toys.  They take the images they need and edit them to fit their story.  Some students superimpose multiple images together, and other students make due with what they have at hand. 

We type up our story and import all of our text and images into Windows Movie Maker.  The students really enjoy this program and it's exciting for them to see how they can transform still images into a video.  I teach the students how to time each slide, how to add various effects and transitions as well as how to incorporate music using clipping and fading.  I never get tired of watching their finished movies!  They are so unique and strange in the best kind of way! 

Finished examples:


These are the guidelines I give my students:

A Toy Story

Telling a Story Through Photographs

You are going to write a 12-15 page story about a toy that has come to life and had its own adventure/day out.  For each page that you write you will also have to stage a scene and photograph it to go along with the text (If you wrote 12 pages, you will take 12 photographs.  If you wrote 15 pages, you will take 15 photographs).  The “pages” are not full page word documents.  It can simply be one or two sentences that describe what is going on.  This is similar to a children’s picture book, there is not a lot of text, but it gives us just enough information to understand what is happening.  However, you will be using the parts of a story to demonstrate understanding through the use of a beginning, middle and an end.

First, you will write your short story (have fun with it and make it interesting).  You will then be given a toy (you are responsible for these toys and must return them in their original condition) or you can use/provide your own toys to be used in this project.  You can use class time to take photographs or do them on your own.  You may use any editing tools to enhance your images, including altering them as we did with our Surrealism assignment.  Your job is to create a series of scenes in which the toys have become a part of everyday life.  If you have seen the movie Toy Story, then it’s just as though the toys have come alive and are roaming around amongst us.  You will stage them in an interesting manner and take a series of digital photographs to document their adventure.  You may edit your image(s) with www.Pixlr.com/editor if you would like.  Be sure to pay close attention to your angles with this kind of photography.  Have fun!  Be Creative!

We will turn your images and text into a PowerPoint Presentation which we will then convert into a movie using Windows Movie Maker.  These steps will described and taught to you as you continue the assignment.

Monday, December 17, 2012

Writing Practice for Toy Story in Windows Movie Maker

Writing Practice

Creative Writing and Photography to Tell a Story in Windows Movie Maker

Art classes truly are cross curricular in every sense, whether the students realize it or not.  In all of my classes I like to incorporate some sort of writing; often times it is a critique, an artist statement or a short story to go along with a piece of artwork.  In my digital photography course, I teach the 8th graders how to transform a creative writing piece into their very own movie.

We begin by discussing plot, something they have already learned in their English class.  We focus on the need for a beginning, rising action, a climax, falling action and a resolution.  I explain the remaining criteria for their story and how it will be made (setting up and photographing toys in real life settings or superimposing a series of images together-as long as they photograph at least part of the image used for each scene). 

For practice, I show them a series of photographs taken by various photographers (websites provided for each photographer linked under each image) and ask that, as a class, they come up with sentences that would go with the image and where it would take place in the story (either beginning, middle or end).  Below are some of their examples, they are so creative!

 Image ‘Sasquatch Attack’ by Brian McCarty

Middle: Sasquatch Joe sought revenge on Susie for dressing him like a girl all of those years.
 

Image by Brian McCarty

Middle: Trina unleashed her road rage on the innocent bystanders.
 

Image ‘Cammy and Guile’ by Zelevol

Beginning: G.I. Joe and G.I. Jane arrive at the airport; ready to take their honeymoon trip to Hawaii, Canada.

Middle: They just got back from their honeymoon and were mugged.  They walked home sadly.

End: Feeling victorious, they walked home with pride in their hearts after defeating the evil Pigbutt.

Alternative Ending: Barry and Luanne lived happily ever after.
 

Image ‘Oh Noes’ by Chris McVeigh
 
Middle: The chipmunk ate Steve’s friend, Gerald! Steve declared war on all chipmunks and poisoned their almonds!

 
Image ‘GTA III’ by Brian McCarty
 
Middle: Jake was called in for reinforcements to help his friends involved in a catfight.


Image ‘Cheez-It’ by Brian McCarty
 
Middle: Toby got in trouble with Mr. Squeakers for eating his CHEEZ-ITs.

End: Billy Bob Joe finally made his way through the epic maze with Mr. Squeakers and claimed their prize!  YUM!

Saturday, December 8, 2012

Andy Warhol Inspired Portraits

Pop Art Portraits

Andy Warhol Inspired Photo Transfers

Photo Transfer Pop Art Portrait
My Finished Portrait
My students took a look at Pop Art and focused on Andy Warhol recently.  I'm using this as an opportunity to introduce them to new techniques other than just drawing, painting, clay and the mixed media sculpture that they are used to.  I am teaching them a photography transfer process.  This project is also great for students who need a confidence boost because it is based on and incorporates a photograph so they aren't as hard on themselves about the finished result. 

We started by looking at a PowerPoint I've created about Pop Art and Andy Warhol.  We discussed the characteristics of his artwork (focusing on portraits).  Since we just finished paint mixing, after awhile I began to focus the discussion on colors he liked to work with and pair together and was able to have a good conversation with the students about contrast and types of colors (tints, shades, primary, secondary, intermediate, etc).  Then the fun began!

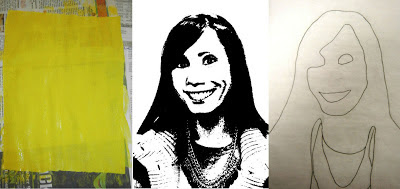
We started by taking photos.  I had each student stand infront of my white projector screen one at a time and pose however they wished.  Some students smiled, some made faces and others prefered their very own mug shot!  In my spare time, I posterized their photos using www.pixlr.com/editor and printed them as 8x10 images (on plain printer paper).  Below is the example of me and the first 3 steps:
How to Make Pop Art Portraits

The students each got an 8x10 sheet of fabric and painted it a color of their choice.  This would be their background.  While the paint dried, they took their 8x10 photo of themselves and a sheet of tracing paper to trace the basic shapes of their face and/or clothing. I urged them to press hard with their pencil and only trace major shapes that they would like to paint a second color.  I also encouraged them to trace shapes that they would want to match the same color as their background.  Every now and again a few students find this step confusing, I reassure them that there is not a right nor wrong way to do it and in the end, they all do a great job!

When the paintings were dry, we layed the tracing paper face down (pencil side down) onto the fabric and re-traced their tracing, but from the back side of the paper.  The students were amazed to find that this pressed their pencil from one side of the tracing paper onto their fabric.  I reassured them that their portrait should look "backwards."  We took our pencils directly onto the fabric to make the outlines stand out more.
How to Make Pop Portraits Tracing with Contrasting Color and Accents with Gloss Gel Image Transfer

The students used their new outlines to paint their second color.  I requested that they use a color that would be considered fairly high contrast to their first color.  As the paintings dried, we trimmed away the extra paper on our photographs. 

When they were dry, we covered our fabric with gloss gel medium.  To spare my brushes I had the students spread the gel over their entire sheet of fabric using their finger.  For the squeamish, I offered disposable gloves.  We then pressed our photo directly (and firmly) into the gel and allowed them to dry.

We used sponges and water to go directly over our paper so that it would begin to peel away.  After removing all of the remaining pulp, we had our image transfer and pop portraits!

Friday, December 7, 2012

Surrealism

Surrealism with Digital Photography

Students Use Photo Editing Skills to Create a Surreal Image

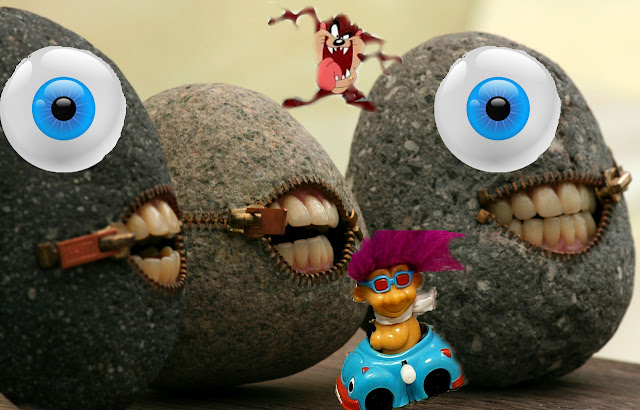
I'm teaching my digital photography students some new techniques to photo editing and focusing on how to superimpose one image into another.  I've also taken this as an opportunity for them to show me their weird side and introduce them to Surrealism.  I've asked that they create a surreal image by superimposing a minimum of four images together (they had to take a minimum of one of the photographs and the others could be "found").  I offered a box of toys and random props to use to their own personal photography contribution in the assignment.  The results are beyond hilarious!  I absolutely love how funny they are and much fun the kids had while they made them!  I highly recommend this lesson! 

Here are a few of their surreal images they've created.  I am only posting the ones without their faces in them.  

Superimposing digital images together to create a surreal image

Unfortunately I cannot site where my students got the images they put together. They were to be photographer of at least one of the photos used but the others could be found online. I did not have them site where they got the images from, only that they submit an original copy of the image to me digitally. In the future, I would ask them to site the found photographs so I could give credit where credit is due.

Superimposing digital images together to create a surreal image