Showing posts with label Writing. Show all posts

Wednesday, March 21, 2018

Micrography

Micrography Text as Art Middle School Art Lesson
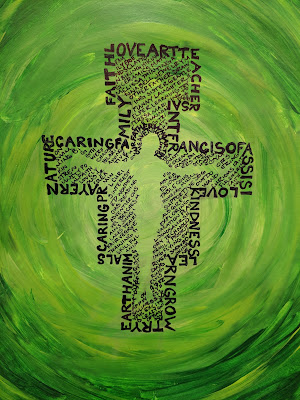
I teach at Saint Francis of Assisi School and the San Domiano Cross
is a part of our logo, so I used it as my example

New vocab and new lesson for this lady!  While I've been familiar with the art style for awhile, I had no idea it was called "micrography."  I wanted to try something new with my 6th graders so I tried micrography and loved it! 

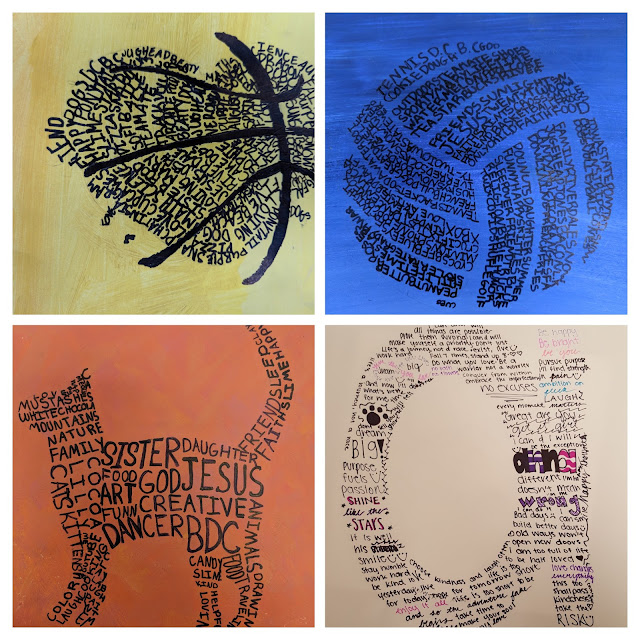
We began by learning about micrography and what it is.  Then we discussed symbolism.  I asked students to choose symbols that represented themselves and their interests; this symbol would be the image we used in the creation of our micrography.  Students were also allowed to create a self portrait in this style, though none of them took me up on this offer.  I also had the students write a list of 40 things about themselves and their interests in their sketchbook.  The list could be specific (names of people we care about, favorite movies/music, etc) and/or vague (general likes). 

Finally, we got our hands dirty!  We started with learning about paint mixing, shades, tints, and hues of colors.  We then put this knowledge to use by painting a background.  I asked my 6th graders to demonstrate the creation of at least three hues of their chosen color for their background.  I encouraged lighter colors so that the markers they would be using for the micrography would show up better but ultimately left that decision up to the students themselves.  They could paint their background however they'd like (my example above, is done more circularly) as long as the hues transitioned smoothly (no blatant stripes). 

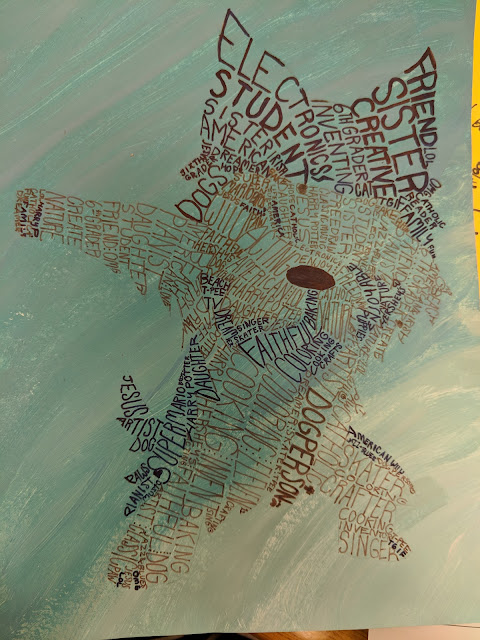
After we painted our backgrounds I allowed students to find an image/symbol online that represented themselves and print it off.  Normally I don't allow tracing in my classroom, but this time I made an exception; though it could easily be done without the tracing steps, it would just take up more class time.  I had the students trace their symbol's outline/silhouette onto a sheet of tracing paper.  We laid the tracing face down onto our background painting and with a little pressure from our pencils, transferred the image into our background lightly.  We put our written "about me" list to good use and filled our silhouettes.  I encouraged playing with font, font size, and font thickness to define different details of our images.  I made sure to repeat (many times) that it wasn't important if a word had to be broken up to define a space, the symbolism is in the intent and visual as a whole, not whether or not a single word is written as it would be in our normal day to day writing.  While some students struggled to understand how to fill "edge to edge" most of them did an amazing job and created some beautiful pieces of artwork!
Micrography Text as Art Middle School Art Lesson

Micrography Text as Art Middle School Art Lesson
I just love this dabbing puppy!

Micrography Text as Art Middle School Art Lesson

Micrography Text as Art Middle School Art Lesson

Thursday, May 2, 2013

Middle School Art Show

 
This year, myself and my fellow Art Teacher at Ballard Middle School, Jill Maahs have entered a total of 13 student works to the Octagon Center for the Arts' upcoming show in Ames, Iowa.  We dropped off the artwork yesterday and are awating the shows opening on May 6th with a reception on the 9th as well. 
 
Since the show hasn't started yet, I have to brag early and have posted photos of the student work I submitted as well as their artist statements below
 
Briesen Borsheim
Grade 6

In art class, we were studying the Chinese Terracotta Warriors.  For my warrior, I decided on using clay slabs for the torso and legs and coils for the arms.  My warrior is wearing a sash that says he is the General because I wanted people to notice my artwork and know that it is mine.  He also has a knife attached to his belt because he is supposed to be “in war.”  Our warriors were fired using a smoke fire process to make them look more like how the Chinese warriors look today.  I love my warrior!

 
Mira Luke
Grade 6

In Art and Social Studies class we were studying the ancient Chinese Terracotta Warriors.  For my clay warrior I decided to make his form using slip and scored slab building techniques.  I gave my warrior a bun for its hair and a mini sword.  Our warriors were fired using a smoke fire process to make them look more like how the Chinese warriors look today.  Making the Terra Cotta Warriors was a very fun project!


Maggi Mallon
Grade 8

For my photography class, my teacher said that we had to utilize Eight Tips and Tricks to Great Photography.  One of them, in particular, stood out to me; Fill the Frame.  We went to a nearby park and took photos of whatever we wanted to.  My friend, Haley and I were just strolling along the grass and looked down and we found a leaf.  Haley has very beautiful eyes so we decided to use the leaf as a mask to emphasize them.  When I edited the photo, I chose to use the cross process to bring out the light that reflected off of her white eye shadow.


Kaitlyn Vasey
Grade 8

In my photography class, we had to take pictures of a variety of things using the different types and styles of photography.  I have always loved flowers and I needed to take a macro photo.  I chose to take a picture of a flower.  I thought the twigs and leaves behind it would make the flower stand out.  You can see all of the imperfections in the flower.  It reminded me of my friends; we are all a pretty flower, imperfections and all. 


Sam Upah
Grade 8
In digital photography, we were playing with perspective and finding new ways to look at things.  This tree has been photographed up close and from the base to in the macro setting to show detail and a unique view point.

Tuesday, December 18, 2012

Toy Story in Windows Movie Maker

Toy Story with Windows Movie Maker

Students Use Writing and Photography to Create an Original Movie

Inspired by Disney's movie A Toy Story, I have created a digital photography lesson plan in which students must create their own toy tale/adventure and turn it into a short video.  After spending some time writing our stories (contact me if you'd like the full lesson plan) we plan our photographs.  Each page of text (written like a children's story so one page is only a few sentences long) needs to have one photograph to go along with it.  The students have a box of random objects and toys I provide or they can supply their own toys.  They take the images they need and edit them to fit their story.  Some students superimpose multiple images together, and other students make due with what they have at hand. 

We type up our story and import all of our text and images into Windows Movie Maker.  The students really enjoy this program and it's exciting for them to see how they can transform still images into a video.  I teach the students how to time each slide, how to add various effects and transitions as well as how to incorporate music using clipping and fading.  I never get tired of watching their finished movies!  They are so unique and strange in the best kind of way! 

Finished examples:


These are the guidelines I give my students:

A Toy Story

Telling a Story Through Photographs

You are going to write a 12-15 page story about a toy that has come to life and had its own adventure/day out.  For each page that you write you will also have to stage a scene and photograph it to go along with the text (If you wrote 12 pages, you will take 12 photographs.  If you wrote 15 pages, you will take 15 photographs).  The “pages” are not full page word documents.  It can simply be one or two sentences that describe what is going on.  This is similar to a children’s picture book, there is not a lot of text, but it gives us just enough information to understand what is happening.  However, you will be using the parts of a story to demonstrate understanding through the use of a beginning, middle and an end.

First, you will write your short story (have fun with it and make it interesting).  You will then be given a toy (you are responsible for these toys and must return them in their original condition) or you can use/provide your own toys to be used in this project.  You can use class time to take photographs or do them on your own.  You may use any editing tools to enhance your images, including altering them as we did with our Surrealism assignment.  Your job is to create a series of scenes in which the toys have become a part of everyday life.  If you have seen the movie Toy Story, then it’s just as though the toys have come alive and are roaming around amongst us.  You will stage them in an interesting manner and take a series of digital photographs to document their adventure.  You may edit your image(s) with www.Pixlr.com/editor if you would like.  Be sure to pay close attention to your angles with this kind of photography.  Have fun!  Be Creative!

We will turn your images and text into a PowerPoint Presentation which we will then convert into a movie using Windows Movie Maker.  These steps will described and taught to you as you continue the assignment.

Monday, December 17, 2012

Writing Practice for Toy Story in Windows Movie Maker

Writing Practice

Creative Writing and Photography to Tell a Story in Windows Movie Maker

Art classes truly are cross curricular in every sense, whether the students realize it or not.  In all of my classes I like to incorporate some sort of writing; often times it is a critique, an artist statement or a short story to go along with a piece of artwork.  In my digital photography course, I teach the 8th graders how to transform a creative writing piece into their very own movie.

We begin by discussing plot, something they have already learned in their English class.  We focus on the need for a beginning, rising action, a climax, falling action and a resolution.  I explain the remaining criteria for their story and how it will be made (setting up and photographing toys in real life settings or superimposing a series of images together-as long as they photograph at least part of the image used for each scene). 

For practice, I show them a series of photographs taken by various photographers (websites provided for each photographer linked under each image) and ask that, as a class, they come up with sentences that would go with the image and where it would take place in the story (either beginning, middle or end).  Below are some of their examples, they are so creative!

 Image ‘Sasquatch Attack’ by Brian McCarty

Middle: Sasquatch Joe sought revenge on Susie for dressing him like a girl all of those years.
 

Image by Brian McCarty

Middle: Trina unleashed her road rage on the innocent bystanders.
 

Image ‘Cammy and Guile’ by Zelevol

Beginning: G.I. Joe and G.I. Jane arrive at the airport; ready to take their honeymoon trip to Hawaii, Canada.

Middle: They just got back from their honeymoon and were mugged.  They walked home sadly.

End: Feeling victorious, they walked home with pride in their hearts after defeating the evil Pigbutt.

Alternative Ending: Barry and Luanne lived happily ever after.
 

Image ‘Oh Noes’ by Chris McVeigh
 
Middle: The chipmunk ate Steve’s friend, Gerald! Steve declared war on all chipmunks and poisoned their almonds!

 
Image ‘GTA III’ by Brian McCarty
 
Middle: Jake was called in for reinforcements to help his friends involved in a catfight.


Image ‘Cheez-It’ by Brian McCarty
 
Middle: Toby got in trouble with Mr. Squeakers for eating his CHEEZ-ITs.

End: Billy Bob Joe finally made his way through the epic maze with Mr. Squeakers and claimed their prize!  YUM!

Wednesday, November 28, 2012

Critiques

Writing a Critique

Students Learn How to Critique their Photography

Critiquing one's artwork is important for reflection and for growth as an artist.  I always like to take some time with my students to discuss what they think they were most successful with, why and what they struggled with and how they got through the struggle.  I also ask that they think about what they would change if they were to go back and redo or fix part (or all) of their artwork.

In my digital photography course, the students are experimenting with composition and trying to find their photographic voice.  For their first critique, I asked them to read an example of my own based on this article I found online by Haje Jan Kamps.  We discussed the purpose of writing critiques and I sent them on their way. 

After discussion and my example, this is what I give them to get them started.  Each student can then upload their own photo and reflect on what they have done:

Read the article provided about how to critique a photo. 

Now it is your turn.  Insert one of your photos  that you would like to critique.  Complete the following sentences and elaborate on them to create paragraphs (a minimum of 3-4 sentences each).

DELETE THIS BOLD/CAPS TEXT AND INSERT PHOTO HERE! 

When I look at this photo, it makes me think of…
Technically I think this photo is…
What I like about this photo is….
If I were to improve or change anything I would…


This is one of my student's finished photography critiques (along with her fabulous photo!).  It is short and sweet but it shows that she has thought about her work and she knows and understands the processes she has gone through to be successful.
Writing a Photo Critique Art Lesson
When I look at this photo, it makes me think of a fantasy movie with fairies and magic. The sparkles on her eye shadow remind me of sparkles on fairies wings, and the magic part of it. I like the colors of it because they are exciting.

Technically I think this photo is a good example of using frames, because the leaf holes are framing her eyes.  It also demonstrates how to fill the frame interestingly. I like it because it was a natural frame, and all we did was punch out holes for the eyes to create this mask.

What I like about this photo is the light. I like the way the light is dark, then bright. I also like how the leaf color matches the dots of brown in her eyes too.

If I were to improve or change anything I would want to make the leaf blurry and her eyes in focus.  I would not want it to be completely blurry, just enough that the eyes really popped out.  I could also go in and edit the color of her eyes so they would stand out and leave the leaf as it is.

Thursday, October 25, 2012

Ancient Egyptian Mummy Tales

Mummy Tales

Students Write a Biography to go with their Mummy Form

After the Sixth Graders accessorized their mummies, they wrote short stories about them.  Their basic requirement was to give a brief bio describing who the mummy was, what they were interested in and how they died (all while making sense with their accessorized mummy) as they incorporate an Egyptian reference or two.  I am constantly wowed by what they come up with, such creative minds!
Egyptian Mummy Art Lesson Plan with Writing
This particular mummy is accesorized with a monocle, bow tie and cane so his story was about being young and wealthy before dying at the clutches of a crocodile in the Nile River.

Here is another one of my favorites.  Her story was about Mummy Jordan (a bandage filled homage to Michael Jordan).  She even made a free standing basketball hoop and a ball out of a pom pom!
Egyptian Mummy Making Art Lesson Plan