Showing posts with label Line. Show all posts

Friday, April 11, 2014

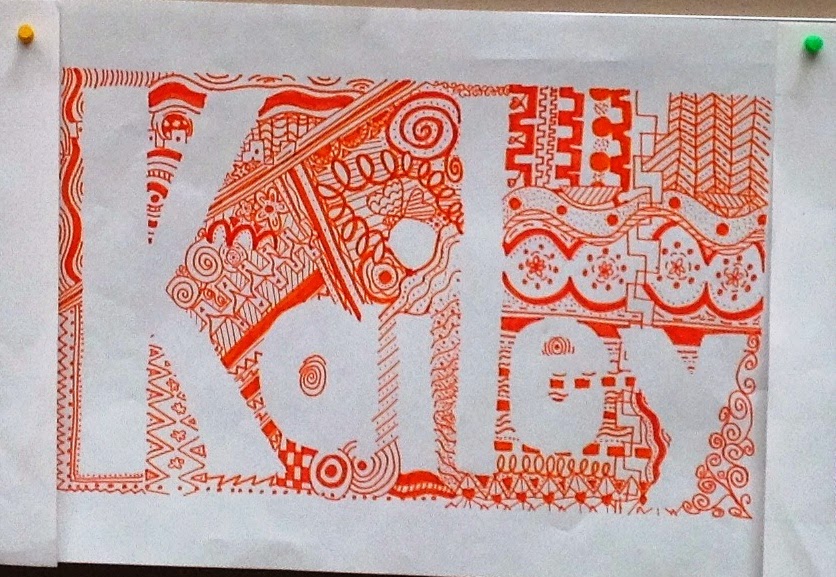
Positive & Negative Space Zentangles

Zen that tangle

Positive Negative Space Zentangle with Unity and Variety Art Lesson

My school year is divided into trimesters and each trimester, I switch which level of middle school I teach.  I recently (okay, it's been a few weeks now but I've been slacking on the blog) began the third trimester and am teaching eighth grade.  I'm awful with names, so this project was perfect to start with so that I could work on that skill (learning their names) AND still have an art agenda!  

Without much--or any--instruction, I started by having the students draw four patterns in their sketchbook, followed by four designs.  Then I asked them to describe the difference between design and pattern.  I also had them describe "variety" and how it can be used in design making.  We looked at our sketchbooks and what we had drawn, then discussed what makes a good design/pattern and a bad design/pattern and how variety can play a role.  We talked about variety in color, thin/thickness of a line, types of lines or shapes, direction/angle and anything else we could possibly come up with that you could vary in the process of art making.  We also made a list (they were actually drawings) of different types of lines and shapes on the white board.  Once we had a handle on those things, we moved on to talk about positive and negative space and what we would be doing with these various art words/techniques.

We started by drawing a 1.5" border around their paper (this was just an excuse to remind them how to hold and use a ruler to draw a straight edge as well as how to measure a border consistently instead of eyeballing it).  I asked them to write their name in bubble or block letters inside of their frame and to make sure none of their letters were touching.  I had them use their ruler to divide their framed area into six random sections.  In each section I had them draw a different type of line (just to keep them on their toes about the variety aspect--they have to incorporate that random line into a design somehow, right?).  I reminded them of what a Zentangle is and how they should keep adding details and eventually find that they are "lost in design."  I also reminded them to maintain their letters as the negative space and to fill designs/patterns right up against and in between each letter.  

I let them decide if they wanted to use one color or multiple colors and just encouraged those who chose multiple to keep an eye on even color distribution.  At the end, I told them that they could use colored pencils to add some shading if they wanted some depth to a few areas of their zentangle, but unfortunately, many of them thought that they could just color in their background (which kind of defeated our designs forming the positive and negative space instead of an outline or coloring in of something).  The variety came out great and many of them really grasped the concept of unity too!  I love having our halls decorated with these beautiful name designs!

As I go to post these photos, I realize how blurry they are and crooked many of them are, I apologize...I need to stop using the iPad as a camera, I never take good photos with that thing!
Positive Negative Space Zentangle with Unity and Variety Art Lesson

Positive Negative Space Zentangle with Unity and Variety Art Lesson

Positive Negative Space Zentangle with Unity and Variety Art Lesson

Positive Negative Space Zentangle with Unity and Variety Art Lesson

Positive Negative Space Zentangle with Unity and Variety Art Lesson

Positive Negative Space Zentangle with Unity and Variety Art Lesson

Positive Negative Space Zentangle with Unity and Variety Art Lesson

Positive Negative Space Zentangle with Unity and Variety Art Lesson

Positive Negative Space Zentangle with Unity and Variety Art Lesson

Positive Negative Space Zentangle with Unity and Variety Art Lesson

Positive Negative Space Zentangle with Unity and Variety Art Lesson

Positive Negative Space Zentangle with Unity and Variety Art Lesson

Friday, December 13, 2013

Christmas Ornament Drawing

Tis the Season!

Fourth Grade Christmas Ornament with Meaning and Variety Art Lesson

As an art teacher, it's hard to get away with not doing some holiday themed art projects.  My struggle is to keep them from being too crafty where they all look the same while still keeping the kids excited and wanting to share their holiday artwork with their friends and family.  In my free time while perusing the internet, I came across this art lesson from another blog--Art Projects for Kids--and decided to adapt it just a tiny bit for my fourth graders.
Fourth Grade Christmas Ornament with Meaning and Variety Art Lesson


I started the lesson by having my students make a list on our white board of words that describe the real meaning of Christmas (I discouraged "presents" and "Santa" on this list but that didn't stop from kids saying them).  We ended up with a fantastically lengthy list from each of my 4th grade classes.  I let the kids know that we were going to be keeping those words in mind in our art project but we were also going to incorporate something else; variety.  I introduced them to "variety" and we discussed how you can have variety among lines (through type or thin/thickness) as well as shapes and colors.  This is when I showed them what we were making.  

Fourth Grade Christmas Ornament with Meaning and Variety Art Lesson

I allowed students to trace stencils if they'd like (I created stencils of four shapes of ornaments, trees and crosses) or free hand their images.  I asked that they fit at least three items on their paper and start but drawing/tracing with "whisper lines" so we could erase them later.  We then filled each shape (regardless of what it was) with at least one word that describes the real meaning of Christmas in an interesting font and the rest of the shape should be filled with lines and shapes while demonstrating "variety."   In the end, we erased our "whisper lines" and the goal was that you could still tell what the original shape was without it being outlined or entirely colored in.  A few kids still colored their shapes in or outlined them, but for the most part, I think this gave the kids a chance to remember what this season is about and practice using some basic art elements.  The drawings came out beautifully and the kids were eager to take them home!

Fourth Grade Christmas Ornament with Meaning and Variety Art Lesson

Fourth Grade Christmas Ornament with Meaning and Variety Art Lesson

Fourth Grade Christmas Ornament with Meaning and Variety Art Lesson

Fourth Grade Christmas Ornament with Meaning and Variety Art Lesson

Thursday, December 12, 2013

One Point Perspective

Fourth Grade Art Lesson One Point Perspective
I introduced fourth grade to the concept of one point perspective.  I started by letting them take some guesses as to what it meant and they were pretty close with their guesses.  Most of them based their definitions off of the word "perspective" and their knowledge that it had to do with how you see something.

Once we had the definition down, we put our knowledge to work.  This lesson was also a good opportunity for me to show students how to hold and use a ruler as a straight edge.  I think it is an important skill to have, especially in art, and without this demonstration, a lot of them get tangled up in their own arms!  I had them make an eight sided shape somewhere on the top half of their paper and draw a small dot (or "point") anywhere on the bottom half of their paper.  We discussed how to match up the corners from the shape down to the point and how to know which ones to draw and which ones would be behind the three-dimensional version of the shape if it were real.

Fourth Grade Art Lesson One Point Perspective

 We also took this as an opportunity to play with lines and shapes within patterns and designs.  In each section created from matching corners to the point, they were to draw a different design or pattern.

Fourth Grade Art Lesson One Point Perspective

The kids did a great job and were eager to show off their one point perspective skills during their finished early time too!  Many of them played around with drawing more shapes and even letters in one point perspective!  It's fun to see them take a lesson and run with it by exploring other options.  I wish I had taken some pictures of their free time perspective drawings, they were pretty impressive!


Fall of 2014 Variation and Examples:

I taught the same great lesson to my 4th graders this year but I switched it up a little.  This time, I offered them a challenge.  If they did not want to do the 8-sided shape, they could do their name (or a word) in block letters...in One Point Perspective!  A lot of the kids were excited about that option and accepted the challenge.  Here are some of my (well, actually my students') results:
Fourth Grade Art Lesson One Point Perspective

Fourth Grade Art Lesson One Point Perspective

Fourth Grade Art Lesson One Point Perspective

Fourth Grade Art Lesson One Point Perspective

Fourth Grade Art Lesson One Point Perspective

Fourth Grade Art Lesson One Point Perspective

Fourth Grade Art Lesson One Point Perspective

Fourth Grade Art Lesson One Point Perspective

Fourth Grade Art Lesson One Point Perspective

Fourth Grade Art Lesson One Point Perspective

Some students finished their One Point Perspective early, I gave them an easy way to draw in Two Point Perspective:

Fourth Grade Art Lesson Two Point Perspective Finished Early

Fourth Grade Art Lesson Two Point Perspective Finished Early