Thursday, August 29, 2013

Allow Me to Introduce Myself...


It's a new school year and there are a lot of new faces and a lot of new names to learn!  This year I am staring off art class with a "hands on" (pun intended...you'll get it later) assignment that's all about me...or you...or them, depending on who's reading this.  

I did the usual introduction of myself but this year as Mrs. Heath instead of Ms. Dale!  Of course I had to go over school rules and expectations on the first day, but I also wanted to start right in with some art making.  In doing so, I offered my students the chance to introduce themselves with a little discussion and lots of symbolism.  The students started by tracing their hand onto a sheet of construction paper, they got to choose which color.  Then to keep it simple, we wrote our names nice and big (and decorative, if they were up to the challenge)


With the older students (which currently includes 5th and 7th graders for me...and in later trimesters will include 6th and 8th graders too) I discussed symbolism and how we can represent our interests and personalities with pictures.  With my 4th graders, we just talked about how we can draw pictures of things that show what we like.  I also introduced all of the students to my "no stick figure" rule which of course, temporarily crushed some hopes and dreams.  We brainstormed some possible symbols and then filled our traced hand with anything and everything we could think of to represent ourselves.  When they were finished, the students cut them out.


I asked the students why they think we made hands instead of just filling the paper or using another shape.  They contributed a lot of thoughts about how our hands are a part of us (some even brought up fingerprints as identification) and others talked about the work that we can do with our hands.  We discussed all of these things and talked about how hands can be used to greet (shaking hands), encourage (high-five, thumbs up) and show peace (shaking hands, two finger peace sign).  We also discussed that many hands can do great work.  So I explained to them what our end result would be, which is what you see hanging outside of the school office today.  I combined all of the paper hands to assemble a paper chandelier.  Symbolic of all of the individuals in our school that are working together to make our school a great place.   And hey, it also just looks cool!


Friday, May 17, 2013

Still Life Drawing

In my last post I talked about my students practicing their drawing skills with Tootsie Rolls.  As a follow up and more challenging experience, I asked them to create Still Life Drawings.  We looked at some examples and recapped what we learned with the Tootsie Rolls and got right down to business!

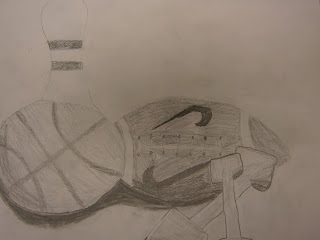
I set up five different Still Lifes with a variety of themes.  I let the kids pick which Still Life interested them the most and we began drawing.  We focused on sketching what we see, adding value and finishing with blending and erasing for highlights.  I reminded them that they all had different view points on the still life so no two drawings would look the same and depending on how large they drew each object, they might only see (and draw) part of the still life.  My only request was that they included at least 4 major elements of the still life...and that they try their best!  We spent 3 class periods on this in total and I think they came out very nicely!  The kids worked hard and I consider this to be the hardest task I gave them this year and it shows that they were up for it!

Theme Option 1: Sports

Above is a Black and White Photo of the Original Still Life with Student Drawings Below


Theme Option 2: Board Game

Above is a Black and White Photo of the Original Still Life with Student Drawings Below
 
 
Theme Option 3: Girl Accessories


Above is a Black and White Photo of the Original Still Life with Student Drawings Below


 Theme Option 4: Art Supplies

Above is a Black and White Photo of the Original Still Life with Student Drawings Below


Theme Option 5: Storybook/Fairytale

 Above is a Black and White Photo of the Original Still Life with Student Drawings Below


Thursday, May 16, 2013

Please Keep Off Grass

If you've ever come across a "Please Keep Off the Grass" sign, this surrealism image my student compiled may give you a good reason to comply...

Friday, May 3, 2013

Drawing From Life

Drawing What We See


A struggle for most people and especially young people is drawing what we actually see instead of what we think something should look like.  This is a challenge I decided to tackle with my 6th graders!


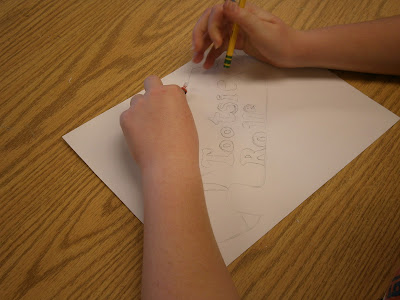
We've started with some delicious practice...and I do mean delicious; we're drawing Tootsie Rolls to start with.  On the white board I drew a rectangle with a triangle on each end and asked them to guess what it was.  Although they guessed that it was candy, I pointed out that no candy actually looks like an oval and triangles.  There is a surprising amount of detail to each piece and variations amongst wrappers.

We spent some time talking about the stages of drawing (sketching, shading/adding value and finishing touches) and discussed the difference between drawing what we actually see and breaking subjects down into smaller lines and shapes instead of trying to force them into what we want them to be or look like. 

The students worked really hard on rendering their Tootsie Rolls to the best of their abilities and came out with some really nice sketches!
Then we started to discuss shading and value a little bit more.  We talked about where shadows and reflections of light typically fall and about how to recreate those with our pencils and erasers.  The students put their best foot forward and charged on with their drawings and added value


We talked about how all drawings need finishing touches and blending to get rid of our pencil lines.  I really emphasized that you do not want to just smudge across your whole drawing or you will loose all of the different values and create one shade of gray.  So I put the kids to work with their choice of Kleenex or their finger for blending and encouraged them to use their erasers too.  All in all, I think this was a great success for them!  Most of them were impressed with their work and couldn't believe what they were capable of...something I'm always trying to get them to realize!


Thursday, May 2, 2013

Middle School Art Show

 
This year, myself and my fellow Art Teacher at Ballard Middle School, Jill Maahs have entered a total of 13 student works to the Octagon Center for the Arts' upcoming show in Ames, Iowa.  We dropped off the artwork yesterday and are awating the shows opening on May 6th with a reception on the 9th as well. 
 
Since the show hasn't started yet, I have to brag early and have posted photos of the student work I submitted as well as their artist statements below
 
Briesen Borsheim
Grade 6

In art class, we were studying the Chinese Terracotta Warriors.  For my warrior, I decided on using clay slabs for the torso and legs and coils for the arms.  My warrior is wearing a sash that says he is the General because I wanted people to notice my artwork and know that it is mine.  He also has a knife attached to his belt because he is supposed to be “in war.”  Our warriors were fired using a smoke fire process to make them look more like how the Chinese warriors look today.  I love my warrior!

 
Mira Luke
Grade 6

In Art and Social Studies class we were studying the ancient Chinese Terracotta Warriors.  For my clay warrior I decided to make his form using slip and scored slab building techniques.  I gave my warrior a bun for its hair and a mini sword.  Our warriors were fired using a smoke fire process to make them look more like how the Chinese warriors look today.  Making the Terra Cotta Warriors was a very fun project!


Maggi Mallon
Grade 8

For my photography class, my teacher said that we had to utilize Eight Tips and Tricks to Great Photography.  One of them, in particular, stood out to me; Fill the Frame.  We went to a nearby park and took photos of whatever we wanted to.  My friend, Haley and I were just strolling along the grass and looked down and we found a leaf.  Haley has very beautiful eyes so we decided to use the leaf as a mask to emphasize them.  When I edited the photo, I chose to use the cross process to bring out the light that reflected off of her white eye shadow.


Kaitlyn Vasey
Grade 8

In my photography class, we had to take pictures of a variety of things using the different types and styles of photography.  I have always loved flowers and I needed to take a macro photo.  I chose to take a picture of a flower.  I thought the twigs and leaves behind it would make the flower stand out.  You can see all of the imperfections in the flower.  It reminded me of my friends; we are all a pretty flower, imperfections and all. 


Sam Upah
Grade 8
In digital photography, we were playing with perspective and finding new ways to look at things.  This tree has been photographed up close and from the base to in the macro setting to show detail and a unique view point.

Wednesday, April 24, 2013

Earth Day

Happy (Belated) Earth Day!

As my 6th graders finished up their Andy Warhol Inspired Portraits I had them use their free time to honor Earth Day.  We've all seen the paper pinwheels on pencils and I saw this as the perfect occassion to make them!  Since it was a "finished early" activity, I simply explained why we were making them and allowed students to decorate them however they wished.  Not everyone had time to make one, so I only have about 40 pinwheels in total.  We used the template shown below, a thumbtack and none other than the infamous No. 2 pencil.  Unfortunately my template was rather large compared to the pencil so they can't actually spin/move with the wind...Oops!  But that didn't stop me from planting them firmly in the ground outside my classroom window.  While they might not be spinning as planned, they are still a beautiful accent and a glorious reminder of how beautiful our planet is!


I think if I were to redo this, I would use longer sticks (rather than pencils) and use papers left behind at the school printer so that we could recycle the unwanted copies into something beautiful!

Friday, April 12, 2013

Smoke Fired Warriors

Terra Cotta Warrior Update-They're Finished!

6th Grade Terra Cotta Warrior Clay Army Art Display
 This is two photos of the display merged together, so I apologize for anywhere that it doesn't quite merge correctly in the middle!


My terra cotta warriors have been smoke fired (or sawdust fired, as some people like to call it)! 
Last week, myself and a former art teacher at Ballard loaded up the kiln aka trash can that I drilled holes into with bisque warriors, sawdust, sticks, pinecones and anything dried up and burnable that I could find.  We started with a bedding of sawdust, added some warriors, more sawdust and burnables, more warriors, etc.

My school let me lock it up in the batting cages so that no one would disturb it and so that once it was running and hot, no one would accidentally touch it out of curiosity  So after it was all loaded, I left it locked up overnight and returned to it bright and early the next morning... 
 And I set it on fire!  Actually, I just tucked a few newspapers underneath a few of the sticks and lit them on fire.
I let it burn for a few minutes and put the lid back on the garbage can so that the flames would become smolders and the sawdust and such would burn down slowly while giving awesome effects to our clay army
I let it burn all day and let it cool for a day before unloading the warriors.  I rinsed them off and could finally show off the finished product!  We had a few casualties (a few heads and feet fell off due to inadequate slipping and scoring) but we managed to doctor all of the warriors up so that they appeared to be intact!  I love our clay army and couldn't be more proud of the work my 6th graders put in and how their army turned out!
 I had to brag to my fellow art teachers in the district of how well the warriors turned out so I took them to the "kiln" for a show and tell session

Some more photos worth bragging about: