Wednesday, May 28, 2014

Origami Nation

It's the Origami Nation Sensation!

Origami Jumping Frogs Art Lesson
Origami Talking Puppets Art Lesson


After the origami butterflies (lesson here) my 4th and 5th graders were hooked!  They practically demanded more origami.  And I was not about to get in the way of their new found passion (or favorite past time for some).  So this is how it went down...

4th Grade:
Origami Jumping Frogs Art Lesson
Origami jumping frogs.  'Nuff said. Insert crowd going wild (i.e. 4th graders jumping up and down cheering once they heard the word "origami." To be honest, after I said that I'm not sure they even heard the words "jumping frogs" above all the cheers).  The butterflies were a little bit tricky at times for the 4th graders, so jumping frogs were right up their alley.  Easy and adorable.  Again, I used a YouTube tutorial which I paused between each step, demonstrated it myself and then helped the kiddos when needed.  Once we had our frogs made (we used 4"x6" florescent notecards for ours), we drew on faces and any other details we wanted.  Then it was time to play games with our frogs!  I made paper lily pads for each table of kids.  The object of the game was to get their frog to jump and land on on the flower in as few jumps as possible.  I also made a bull's eye bullfrog's eye game where the kids tried to land their frog as close to the center as possible to beat out their friends.  A few kids were so taken with the origami frogs that they just kept making more!  I only offered 2 notecards per student due to my supply, but that didn't stop them from using 8x11 cardstock froggies!

This is the YouTube tutorial I used

Our Frog Videos:


Origami Jumping Frogs Art Lesson
Students playing the bull's eye and lilypad games
Origami Jumping Frogs Art Lesson
Some students made froggy families

5th Grade:
It's official!  Fifth grade is NOT too old for puppet making!  My fifth graders had a ball making these origami faces!  We were inspired by the origami double pyramid with this one.  I even found a YouTube tutorial on how to transform the double pyramid into an origami talking puppet!  From that point, I let the students decide how they wanted to design their puppet.  I showed them how they could be held two different ways as a talking puppet and encouraged them to be creative with their facial expressions, features and accessories.  Some of the kids even made it so you could hold their puppet either way and still see a face!  I was quite impressed with their ingenuity and the variety of ideas I had in the classroom!  The results reminded me a lot of the Muppets, so naturally, I recorded my kids with their puppets to the Muppets' song "Manamana!"  I'd share that video but a few I want to maintain the privacy of my kiddos.    Enough about me and the lesson...let's get to more photos!

Origami Talking Puppets Art Lesson
 This student decided to design her origami and keep it as a phone stand.

Origami Talking Puppets Art Lesson

Origami Talking Puppets Art Lesson

Origami Talking Puppets Art Lesson

Origami Talking Puppets Art Lesson


Origami Talking Puppets Art Lesson

Origami Talking Puppets Art Lesson

Videos we used and were inspired by:


Origami Steps/ Tutorial


Muppets-Manamana

Thursday, May 22, 2014

Origami Butterflies

Origami Butterfly Art Lesson with Prayer

I started this lesson talking about the meaning behind it more so than the steps we would go through to get there.  I introduced my students to the Native American symbolism of a butterfly.  According to Native American legend, if you capture a butterfly and whisper a wish to it.  Upon its release, it will fly your wish up to the heavens.  As a teacher at a Catholic school, I then steered this in the direction of prayer instead of wishes.  Though, this lesson could easily be adapted for a public school setting and use hopes, dreams and aspirations instead of prayers.  I explained how we would start by creating watercolor paintings to be used as our origami paper.  We would then write down our prayers, special intentions or anything weighing on our hearts and minds onto the dry painting before transforming them into origami butterflies as a class for an "all school" art display (I say "all school" because I only teach 4th-8th grade students, and  the origami steps might be too tricky for the younger kids).

With my 4th and 5th graders, we started our paintings by learning a little bit about Wassily Kandinsky and non-representational art.  They each made non-representational watercolor paintings on typing paper that I had precut into squares for the origami.  They started by tracing random objects (mostly rolls of tape, cups and various small storage containers) with a pencil and then painted this with watercolors.  I encouraged them to get down large areas of color inside the drawn shapes first and then to add smaller lines and details on top of this.  My older kids were just asked to make a non-representational painting using layering of shapes and lines with the watercolors.  We made the paintings soley for a pop of color and interest to the butterflies, but you could also teach a lesson about using painting as a form of therapy and tie it into the prayers and/or wishes and hopes.
My example painting
During our next class together, I started off by reminding them of our intentions with the paintings and gave them all markers-they could choose any color they wanted to write with.  We wrote directly on our paintings and those who were absent, wrote on a colored sheet of paper that I had also cut to the proper size.  I asked them to write on their painting either a prayer, special intentions, people or things that they wanted to pray for or anything weighing on their hearts and minds.
This prayer is special to our students and parish, as it was written by Fr. Bob, our priest who passed away this year

In order for us to make origami together, I opted for using a YouTube video tutorial, pausing between each step, demonstrating that step myself and then going around to offer assistance to any student who needed it.  Luckily, each class had a few origami gurus who would also help out their struggling classmates.

Origami Butterfly Art Lesson with Prayer
Finished Example
With the help from a few 8th graders, I had the butterflies strung up and ready for display.  I absolutely love walking down this hallway!  I wish I could have hung them lower so that you could literally walk through them, but as a teacher in a K-8 building, I know that wouldn't work so well--it's better in theory.  The hundreds of butterflies on the walls and those flying above our heads are still enough for me!
Origami Butterfly Art Lesson with Prayer

Origami Butterfly Art Lesson with Prayer

Origami Butterfly Art Lesson with Prayer
I strung/taped these ones to rulers and wedged them in the corners of our drop ceiling for easy display purposes


Thursday, May 1, 2014

Gestural Sculpture

It's all about movement

Fourth Grade Wire - Foil - Plaster Gestural Sculpture Art Lesson
Hula Hooping, Jumping Rope and a Ballerina
As usual, I started my lesson by asking my kids questions.  I told them we were going to make gestural sculptures and asked them what they thought we were going to make and what "gestural" means.  I had a photo example up of what we were going to do, so they were able to use context clues.  After a few guesses, someone pointed out that you use your hands to make gestures which lead me into my explanation of "gestural" meaning that it shows movement.  We also discussed "sculpture" but they knew that one right away!

We started off by making stick figure drawings (I normally don't allow my kiddos to draw stick figures but for this, I made an exception) showing some sort of movement.  I gave each student a piece of wire and after a quick demo, I asked that they try to recreate their stick figure with the wire.  Once we had wire people, I gave another short demo of how to wrap their wire person up in foil so that he/she became more three-dimensional.  I emphasized using large pieces of foil and crumpling them around the figure at various angles and overlapping pieces of foil to keep the body together. A lot of kids still wanted to use small pieces of foil, but they quickly found that small pieces fell off immediately and weren't adding any bulk to the body.  I let a few kids use some masking tape to keep their foil on/together, but most of the kids were able to squish the foil together to create a strong enough hold to get us to the next step.
Initial Steps for Making a Gestural Sculpture Art Lesson
First 3 Steps for Making a Gestural Sculpture
In our next step in the process, we added a base with some tape and then plaster.  I pre-cut a series of square and rectangular bases from foam core and cardboard (I just used scraps we had laying around the art room).  Each kid taped his/her tin foil sculpture so that at least one hand or foot was on the base (we used masking tape).

Plaster was new to my fourth graders and they weren't sure what it was, so we spent a little time where I showed them what it was and how it would work and the various stages we would put it through.  I used a cast for a broken arm/leg as an example of what this stuff was similar to.  This gave them a point of reference for what it looked like and how hard it could dry to be.  I order the product Plaster Craft by the roll (it's actually just long strips folded and stacked up in a 20lb box) and I pre-cut it into strips for the fourth graders.  I showed them its original state as a long strip ("Whoa!" was their response followed by lots of giggles and "oohs" and "ahhs") and how I had cut it up into smaller strips for them.  I showed them how the plaster was dried onto gauze and we would need to wet the chalky surface in order to use it to reshape and layer it and make strong sculptures.  I demonstrated the process of dipping the strips into water and then placing it onto my sculpture.  I emphasized to cover the foot/hand on the base first, using the plaster like the tape to stretch across the body and wrap around the base.  I asked them to start by covering the base and appendage first then work their way up the sculpture slowly.  It is important to use the strips in different directions for strength of the plaster structure and to rub the plaster to fill in all of the gauze holes so that painting them would be easier later. I let them feel a finished/dry sculpture so that they could understand how the plaster would dry (again, I referenced casts and their hard surface).
Plaster Step in Making Gestural Sculpture Art Lesson
Plaster Version of Gestural Sculpture
After our sculptures were dry and freestanding, I gave the students a choice.  They could paint their sculpture, or they could Modge Podge scraps of colored tissue paper to the surface.  I explained that they could make their sculpture realistic or decorative, that the important thing was just to cover the entire sculpture so that we didn't see the plaster anymore.  This gave us some added variety.  A few kids even chose to paint parts of their sculpture and then Modge Podge some tissue paper onto the rest!  The kids couldn't believe that these had started as wire stick figures!

Painting with Biggie Cakes Tempera Paint and using Modge Podge with cut tissue paper:


The sculptures came out great, and as usual, my only regret is that I didn't take more photos of them for the blog! The kids couldn't wait to take them home, so I ran out of time before too many had been photographed.  I had skydivers with parachutes, people doing kart wheels, various dancers and runners, the variety was tremendous!  But I didn't capture them all so here is what I can show off/brag about:
Fourth Grade Plaster Gestural Sculpture Art Lesson
Surfer

Fourth Grade Plaster Gestural Sculpture Art Lesson
Ballerina and Dog Walker

Fourth Grade Plaster Gestural Sculpture Art Lesson
Skateboarders (the one on the left had some touch ups done later, but this still shows off his sculpture)


Fourth Grade Plaster Gestural Sculpture Art Lesson
Soccer Players--one in Modge Podge with tissue paper the other, painted

Fourth Grade Plaster Gestural Sculpture Art Lesson
Jump Ropers (I know the one on the left was a repeat, but I wanted to show the different approaches with Modge Podge and those results)


Friday, April 25, 2014

Surrealism Collage

Fifth Grade Surrealism Collage Art Lesson
My Surrealism Collage Example
I love collages!  And most of all, I love hilarious collages!  So when I saw a post by one of the bloggers (Artolazzi) that I follow here about surrealism and collage, I was smitten.  What a fun lesson!  I pretty much followed the same lesson as Jenny Bartolazzi but in my own words and with examples of various artists.  The kids LOVED it!

After we discussed Surrealism and looked at some artwork, I showed them how the process would work.  I had previously cut out the pieces I planned on working with and it made the demonstration go smoothly and quickly.  I started with my chosen background (they could choose from 12 options, all cut from expired calenders--my mother in law donated a bunch of calenders from the bank she works for--thanks, Sue!).  I explained how I started just looking through magazines until I found something that gave me an idea or I thought was funny and/or interesting.  The first thing I came along was the superhero, so I cut him out and trimmed away all of his extra background.  When I stumbled upon a boy on his bicycle, I thought that he had the perfect facial expression for someone who needed saving, so I cut him out too.  But when I found the word bubble with "Help!  It's got my Graham-ma!" I changed my plan (I wanted them to keep in mind that plans can change and evolve as they search the magazines).  And then I searched for my villain which was assembled by a man's face and torso mixed with a basketball player's legs and I tucked "grandma" under his arm.  Grandma was found in a sports magazine and is actually a man dressed up as an elderly woman while wearing a pig nose (not sure why there's a pig nose, but I liked it).  I encouraged them to make a surreal scene and to have fun with it and be open to changing ideas as they come upon various images.  While some of them struggled with unifying their images or creating an overall scene, others were able to dive right in with ease.  And regardless if they made a unified scene or not, they had a blast and that experience and excited attitude are enough for me to consider the lesson a huge success!  Now, FINALLY, I will share some of their work with you!

Fifth Grade Surrealism Collage Art Lesson

Fifth Grade Surrealism Collage Art Lesson

Fifth Grade Surrealism Collage Art Lesson

Fifth Grade Surrealism Collage Art Lesson

Fifth Grade Surrealism Collage Art Lesson

Fifth Grade Surrealism Collage Art Lesson

Fifth Grade Surrealism Collage Art Lesson

Fifth Grade Surrealism Collage Art Lesson

Fifth Grade Surrealism Collage Art Lesson

Fifth Grade Surrealism Collage Art Lesson

Fifth Grade Surrealism Collage Art Lesson

Friday, April 18, 2014

Portrait Drawing and Collaborative Art

8th Grade Portrait Drawing Art Lesson

I'm going to start this blog entry by sharing our portraiture lesson and then explain how this become a collaborative piece. So if you start reading and are wondering how this involves any sort of collaboration, stick with me...I promise, I'll get there!

My 8th graders have been taught how to draw faces before, but it never hurts to revisit a lesson (especially on drawing realistically).  Similarly to how I taught my fifth graders portraiture and proportion, I started by handing my classroom over to Oli on YouTube and letting her show off her skills as a 9 year old, while also teaching my 8th graders the basics.

We sketched out our faces and left them alone for awhile to talk about shading.  Shading faces can be tricky and I didn't want them to just add a little grey and smear it across their faces so that they still looked flat but now they were grey.  So we talked about how shadows and highlights add depth and show us the shape of the object and tell us about its form.
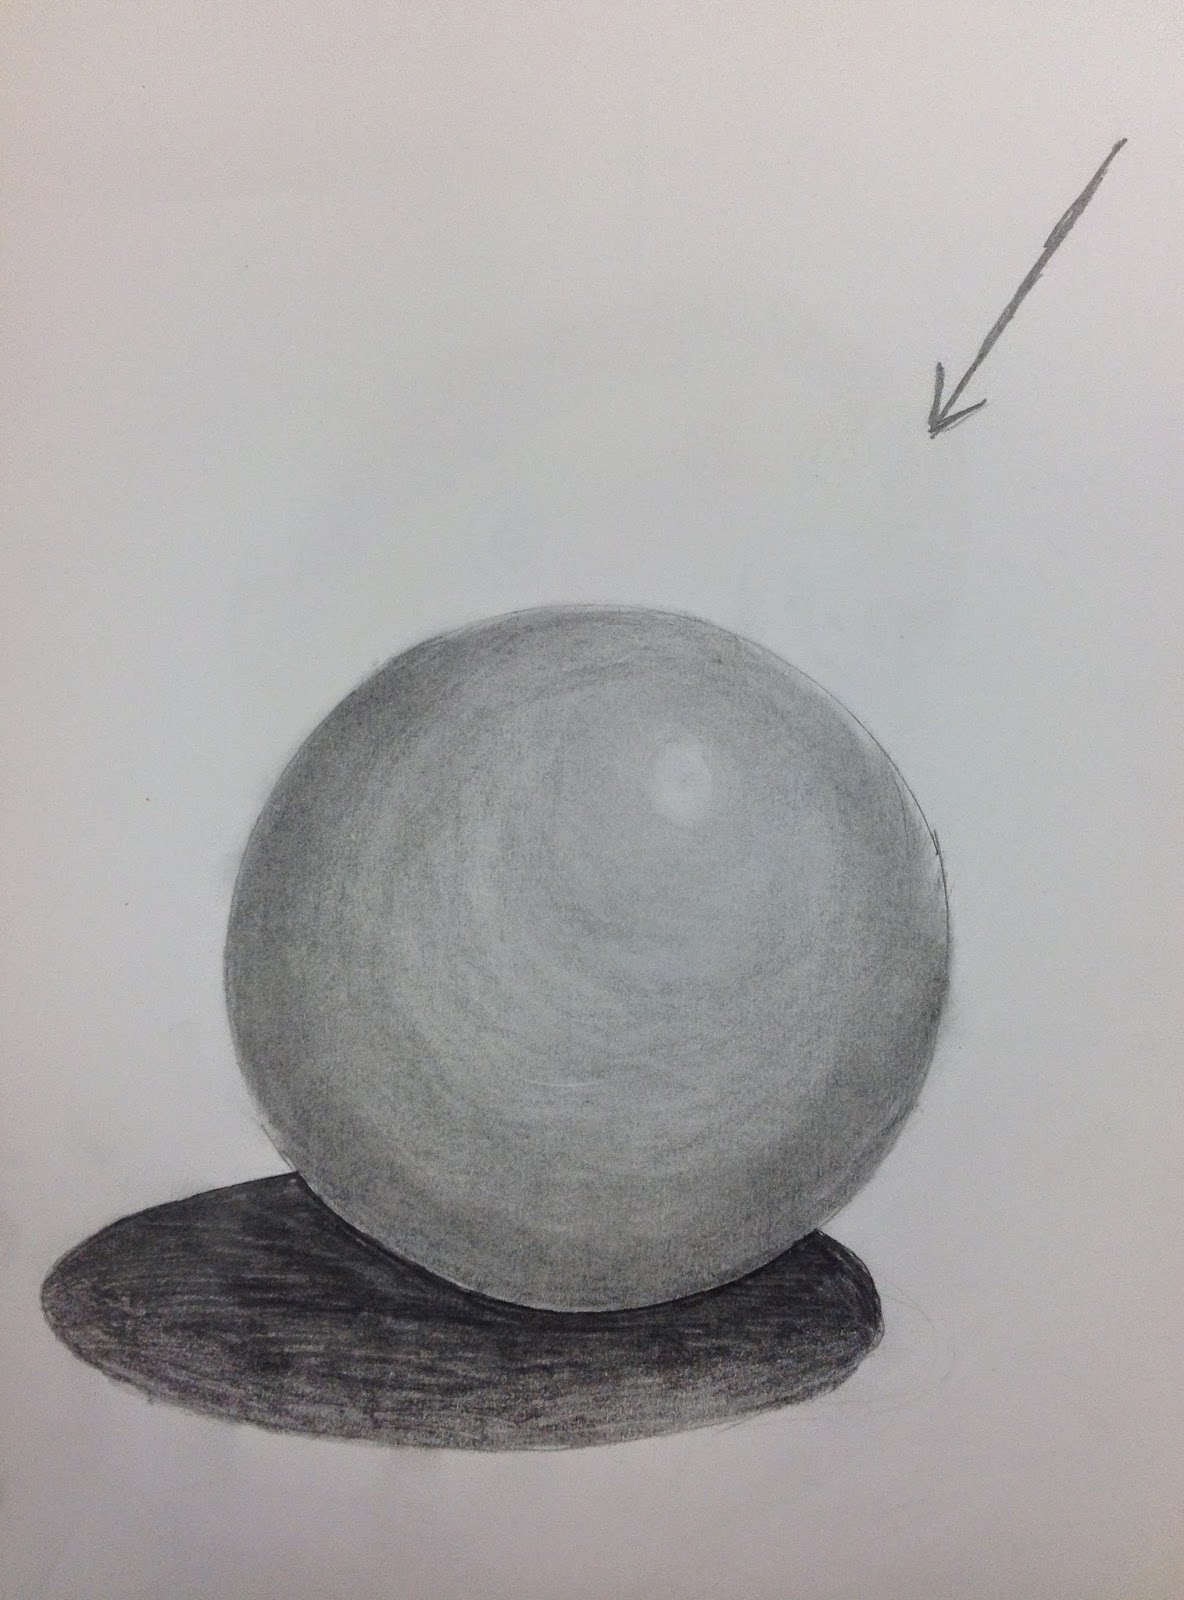
8th Grade Sphere Drawing With Shading and Blending
8th Grade Sphere and Shadow Study
We started out by drawing spheres.  I set out a ball and we noted where shadows were and reflections. Then I put it away and we had to think about it a little bit more.  Where is our light source (pick one)? Where is going to be the lightest spot on our sphere?  How about the darkest?  Etc.  I showed them how to use their pencil in the direction of the curves to accentuate the item's shape and then taught them blending with their finger or a tissue.

Once our spheres were complete, we discussed how that same concept can be applied to anything three-dimensional.  We talked about the high points on our face (cheekbone, forehead, nose and chin) and how/why highlights would fall there.  We talked about the areas with the most shadows and why as well as where middle grey/medium shadows would be.  We also discussed hair and how it is actually individual strands growing from the scalp and not perfectly smooth and colored in solidly.  I reminded them of using their pencil in the direction of the curve on that part of the face and encouraged them to use the sides of their pencils for ease of blending.  We don't have a class set of blending stumps nor shading pencils, so each student was working with their standard #2 and armed with a Kleenex and/or their fingertips.
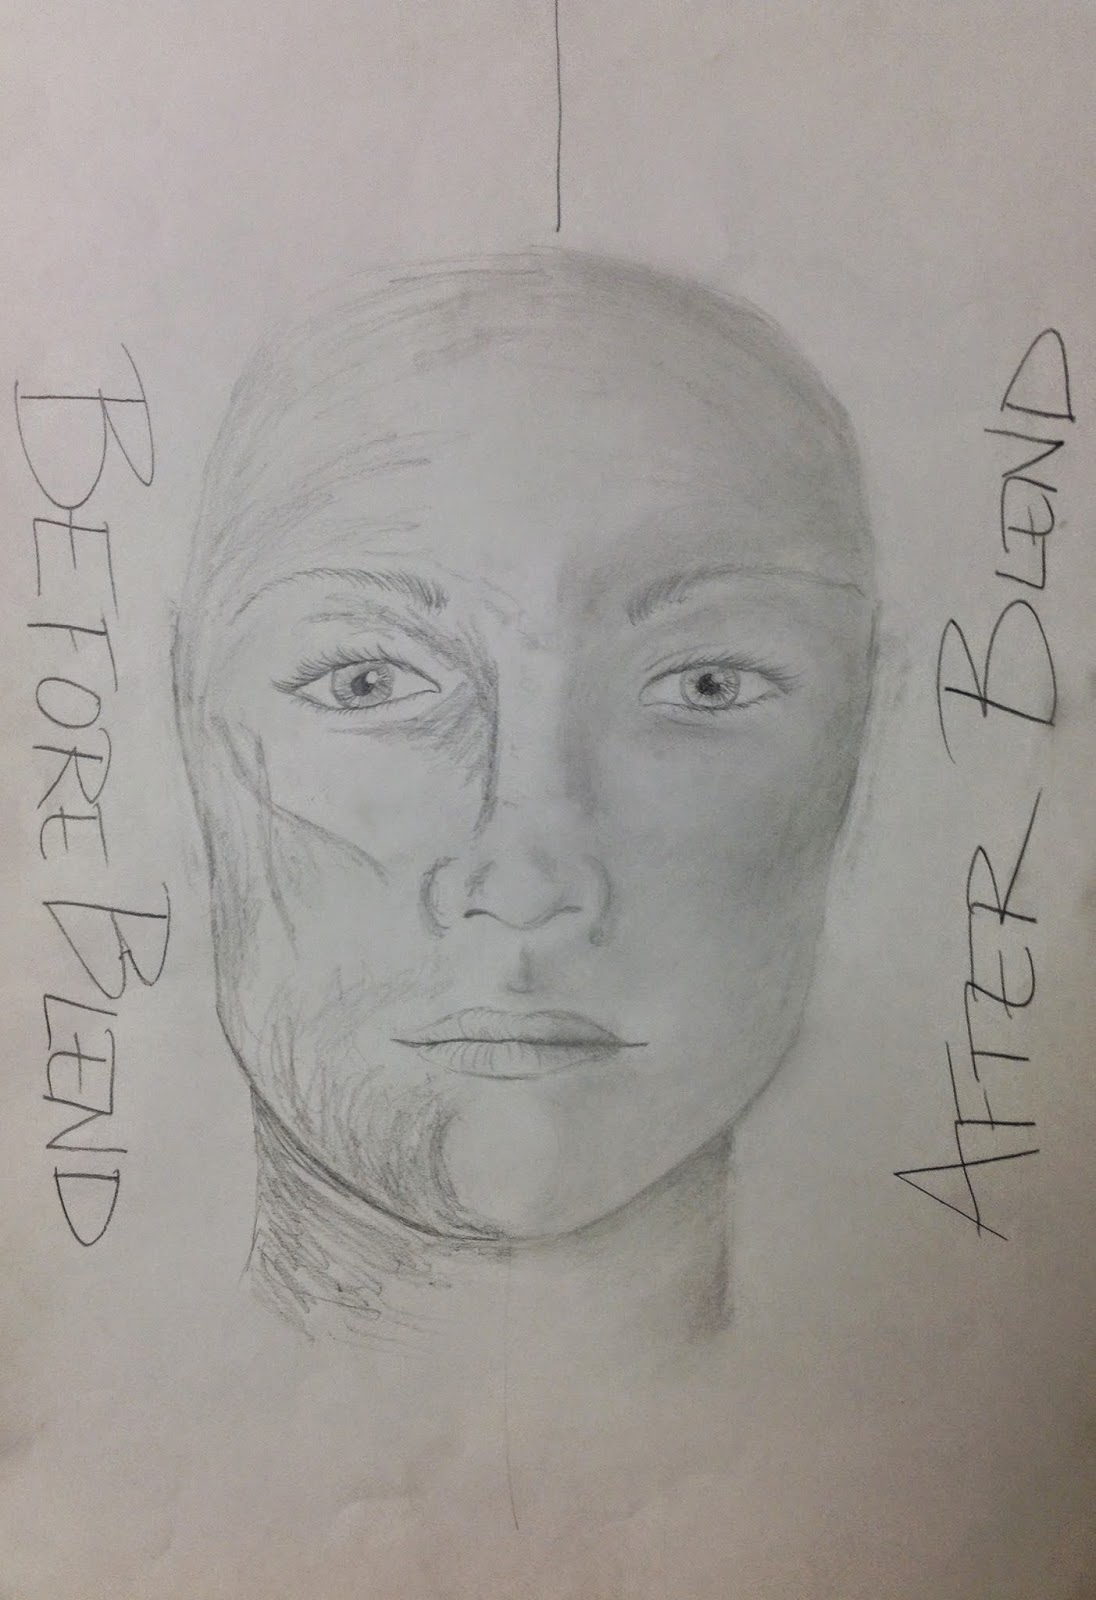
My demonstration example of how shading a face can look before and after blending


8th Grade Portrait Drawing Art Lesson

8th Grade Portrait Drawing Art Lesson8th Grade Portrait Drawing Art Lesson 


8th Grade Portrait Drawing Art Lesson

Once we had covered portraiture...we got into the collaboration!  I work at a K-8 building, and our 8th graders are each assigned a Kindergarten buddy.  The idea is for the 8th graders to show the kindergarten kiddos the ropes and make the little guys feel comfortable in the building and they end up forming these adorable bonds!  This collaboration project was inspired by one of those popular articles that floats around Facebook.  In this blog entry by the artist/blog Busy Mockinbird, an artist and mother discusses and shares images that are created out of collaboration with her four year old.  To cut to the chase, the results are absolutely amazing!  And I wanted my 8th graders to do something similar with their buddies.  

So after we learned about portraiture, I shared my idea and the article with my 8th grade and had each student draw a medium sized head on a blank page in their sketchbook.  The next time that Kindergarten came to art, they were taught about collaborative art and how they were going to be working with their 8th grade buddy (I don't teach the kindergartners Art, but I stopped in and found them cheering at the idea of working in their 8th grade buddy's sketchbook).  And thus, our collaboration portion of the lesson...
Collaborative Art with 8th Grade Portrait and Kindergarten Body Art Lesson

Collaborative Art with 8th Grade Portrait and Kindergarten Body Art Lesson


Collaborative Art with 8th Grade Portrait and Kindergarten Body Art Lesson


But wait, there's more!  After the kindergartners added bodies to our 8th grade faces, they drew a face on another blank page in their buddy's sketchbook.  On which, of course, I had my 8th graders add bodies and backgrounds!

Collaborative Art with Kindergarten Portrait and 8th Grade Body Art LessonCollaborative Art with Kindergarten Portrait and 8th Grade Body Art Lesson

Collaborative Art with Kindergarten Portrait and 8th Grade Body Art Lesson


Collaborative Art with Kindergarten Portrait and 8th Grade Body Art Lesson