The Underground Army
I am unbelievably fascinated by the Chinese Terra Cotta Warriors! So when my 6th graders started learning about China in Social Studies, I jumped at the chance to make our very own! I began by introducing them to the warriors with a PBS video called
Secrets of the Dead: China's Terra Cotta Warriors (link to the video is provided with the title). The video tells about the discovery of the warriors, how they were made, a few guesses of their history and general facts about how the warriors impact science and art today...it is a really great video and the kids absolutely loved it! The video runs for almost an hour so I skipped around a little to get the major points to the kids all within one 45 minute class period.
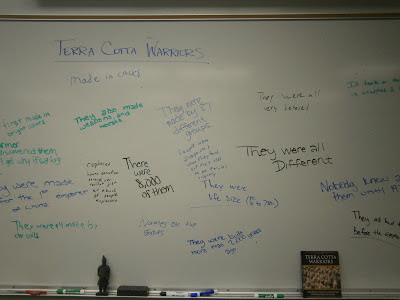
We discussed the warriors and the video and the kids were really excited to get to work on their own clay warriors. I'm always a little leary about playing videos because I'm not sure how much kids pay attention to them but this one had the kids hooked because when we went to write down facts on the white board they remembered all kinds of facts and were asking really good questions based on things mentioned in it, so I considered it a great success for a project intro.
Our white board list of Warrior Facts
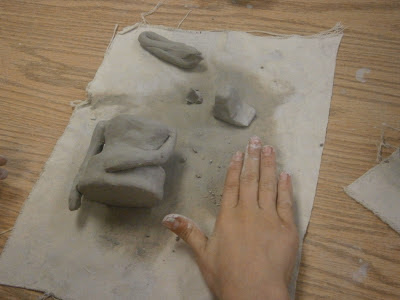
I wanted the kids to start out with the torso and work with proportion from there, I also wanted them to attempt to build their torso out of coils to get a sense of how the original warriors were formed. So after a short demonstration and a brief discussion on body proportion I left each table of students with a drawing dummy (for proportion and body form reference purposes), canvas to work on and chunks of clay and set them to coil building! So of the students really struggled and I encouraged them to keep trying, as the next session, I would offer an easier/more basic method of torso construction. At the end of class, we wrapped up our clay pieces in plastic bags and placed them on a block of wood with each students' name on them. (In the pictures below, I removed the plastic bags.) Make sure you tell the students to blend their coils together as they go to make it easier, some of my students were waiting and when it got as tall as they needed, it started to collapse a little, and since they are only in 6th grade, it is best for them to do a little at a time. I really tried to emphasize size and proportion but I still ended up with some chubby little warriors! More to love, I guess (or battle against)!
.JPG)
The beginning stages of coil built torsos
During our second class period I gave my students the option to finish coil building their torso or start anew with a slab built, cylindrical torso. Many opted for the slab, which is totally fine by me! I had taught my class about clay wedging in a previous class period but to save time, I pre-wedged clay balls for my students. I had also precut some templates and had the kids use those and showed them how to slip/score them together and how to use their remaining slab piecess to close off the top for shoulders and the bottom for a place to attach our legs/feet. They start out looking very clunky and almost mug-like, but once we began adding arms and shoulders, they resembled more of a torso. A few of of my students observed that our torso was now one big airbubble and would explode in the kiln, but I reassured them that we'd poke a hole in them before firing.
These students opted for the slab built torso and have moved on to creating coils for arms
This student has coil built her torso and is smoothing out the slip and scored arm joints
Once the torsos were intact, we moved on to clay modeling. The students used more pre-wedged clay to form coil arms, short/heavy/stable legs and feet and an egg shaped head to be attached to the torso with a modeled neck or an extra thick coil. I reminded them that everything (other than when we are coil building) needed to be slip and scored together to ensure stability. I also reminded students that the warriors needed their arms to be attached to their sides or across their body in some way so that they would be less likely to break. I demonstrated all of these steps and encouraged them to keep the basic shapes simple and then form and add details later (e.g. use one basic coil for arms and hands, then use clay tools to add the correct shape and details to hands). I encourage big fat feet and stumpy legs "as if they are wearing giant gravity boots" for stability, it takes the students awhile to grasp this, but they'll be happy when their warrior can stand and he doesn't get broken ankles! We did these steps over multiple class periods (I can't say specifically how many because our schedule kept getting messed up with late starts and early outs due to snow).

This student is has already added arms to her slab torso and is working on modeling some feet to stabilize her warrior
This student is beginning his feet for his coil built warrior
This student wants to add a weapon in its hand so he is slip and scoring his looped/open hand to the body
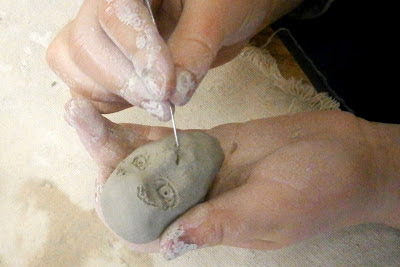
Student sculpting her warrior's head (you can see her torso and clunky feet as well)
Same student as above, this is just the close up shot
Another student sculpting his head is off to a great start!
We modeled some necks to be slip and scored onto the torsos and heads and began adding details to our armor. Many of the students used toothpicks and paper clip ends to add design elements to their warrior clothing. Some went with the look of traditional ancient Chinese armor as seen in the video and others gave them some modern touches like basketball jerseys. I do prefer the warriors more true to history, but I also wanted to ensure that my students had some freedoms in their warrior making. I think it is important for my students to like their final product, since it ultimately is theirs and they were still demonstrating the basic clay building skills and general understanding/appreciation for the Terra Cotta Warriors.
Students assembling their little army!
Don't worry, she won't be headless for long, but please note the stylish necklace
Adding details!
A happy warrior (notice the big grin? such an extension of this student's personality!)
The warriors are pretty much all assembled and ready for battle (with the kiln?)...well most of them are anyway. I cannot wait to smoke fire these warriors! They are looking amazing and I am so impressed with how hard the kids worked! I will be sure to upload pictures of the finished work, smoke fired and all. We still have some finishing touches on a lot of them, but I just couldn't wait that long to share what they have done so far, I am beyond impressed and excited!
Can you even tell which one is the model warrior that came in a Barnes and Noble book set? Or do ours just blend right in?!?
The first finished warriors...the two in the back were made by twins! The one looks so mischeviously angelic and the other may have a little extra padding...
What our army will soon resemble! Stay tuned for new photos of the finished warriors!


.JPG)
.JPG)
.JPG)
.JPG)
.JPG)
.JPG)


.JPG)


.JPG)


.JPG)
.JPG)
.JPG)
.JPG)
.JPG)
.JPG)
