Showing posts with label Value. Show all posts

Thursday, October 16, 2014

Texture Remix

This is the Re-Re-Re-REMIX!

8th Grade Texture Remix Real Object Drawing
Furry, Lumpy and Spikey Grapes
I really enjoy teaching texture rendering (though I'm not positive all of my students have the same affinity for it as I do) because it really pushes some of my students to try something new and a little more challenging.  It forces them to think about angles, space, shapes and perspective while using value and realism.  I think they are all pretty impressed with themselves in the end too!  A more detailed description of the lesson and older examples are posted here.  

My quick tips that I draw up on the board for them to keep in mind while they work

8th Grade Texture Remix Real Object Drawing
Spiked Broken Pencil, Scaley Cup, Stone-Brick-Bump Pumpkin and Misc Texture Paintbrush with Palette

8th Grade Texture Remix Real Object Drawing
Stone Guitar, Scaley and Spikey Hammer with Nail, Woven Turtle and Brick Apple

8th Grade Texture Remix Real Object Drawing

8th Grade Texture Remix Real Object Drawing

8th Grade Texture Remix Real Object Drawing

8th Grade Texture Remix Real Object Drawing

5th Grade Optical Illusions

Op Art!

5th Grade Optical Illusion Art Drawing Lesson
I love teaching about Op Art!  The kids get really excited and love looking at all of the examples and what's even better...they like to discuss them!  I don't even have to prompt them into having a conversation about it, they automatically start the discussion as soon as I show an example!  It's amazing!  Last year I taught the fifth graders an amazing cube optical illusion (lesson here) but this year I wanted more variety and to teach them a little more about shading.  So I gave them a series of options in their illusion.  They all started with 3 circles (though one of my examples below only has one big one) and then they chose their style of background.  They could do "cones with draping ribbon," checkerboard or a checkerboard fading back into space:

5th Grade Optical Illusion Art Drawing Lesson 

5th Grade Optical Illusion Art Drawing Lesson

5th Grade Optical Illusion Art Drawing Lesson

I demonstrated all of the steps (full lesson details for the fading into space plan are here) for drawing out the backgrounds and let the students get to work.  I showed them how to make their circles have the illusion of spheres and had them color in their background and spheres like checkerboards (or color in the "ribbons" along the "cones").  My example used a black marker for this step but some of them opted for color.  After that had been finished or nearly finished by most, we discussed shading and how to shade based on the chosen background.  The kids were all great about knowing that with the distance/checkerboard background, the smaller tiles were darker because they were farther away--and I love that they know that!  So smart!  After that, they finished coloring them in with colored pencils and appropriate shading!

5th Grade Optical Illusion Art Drawing Lesson


5th Grade Optical Illusion Art Drawing Lesson

5th Grade Optical Illusion Art Drawing Lesson

5th Grade Optical Illusion Art Drawing Lesson

5th Grade Optical Illusion Art Drawing Lesson

Since students all work at a different pace--some students didn't quite finish and others had tons of free time.  So I suggested that they use their 'finished early' time looking at Optical Illusion books that I have on hand, drawing a simple optical illusion design with their name (I demo this and how to do this with a wavy line instead of their name) or to try to draw their own optical illusions that they create from their brain!  
5th Grade Optical Illusion Art Drawing Lesson

5th Grade Optical Illusion Art Drawing Lesson

5th Grade Optical Illusion Art Drawing Lesson


Friday, April 18, 2014

Portrait Drawing and Collaborative Art

8th Grade Portrait Drawing Art Lesson

I'm going to start this blog entry by sharing our portraiture lesson and then explain how this become a collaborative piece. So if you start reading and are wondering how this involves any sort of collaboration, stick with me...I promise, I'll get there!

My 8th graders have been taught how to draw faces before, but it never hurts to revisit a lesson (especially on drawing realistically).  Similarly to how I taught my fifth graders portraiture and proportion, I started by handing my classroom over to Oli on YouTube and letting her show off her skills as a 9 year old, while also teaching my 8th graders the basics.

We sketched out our faces and left them alone for awhile to talk about shading.  Shading faces can be tricky and I didn't want them to just add a little grey and smear it across their faces so that they still looked flat but now they were grey.  So we talked about how shadows and highlights add depth and show us the shape of the object and tell us about its form.
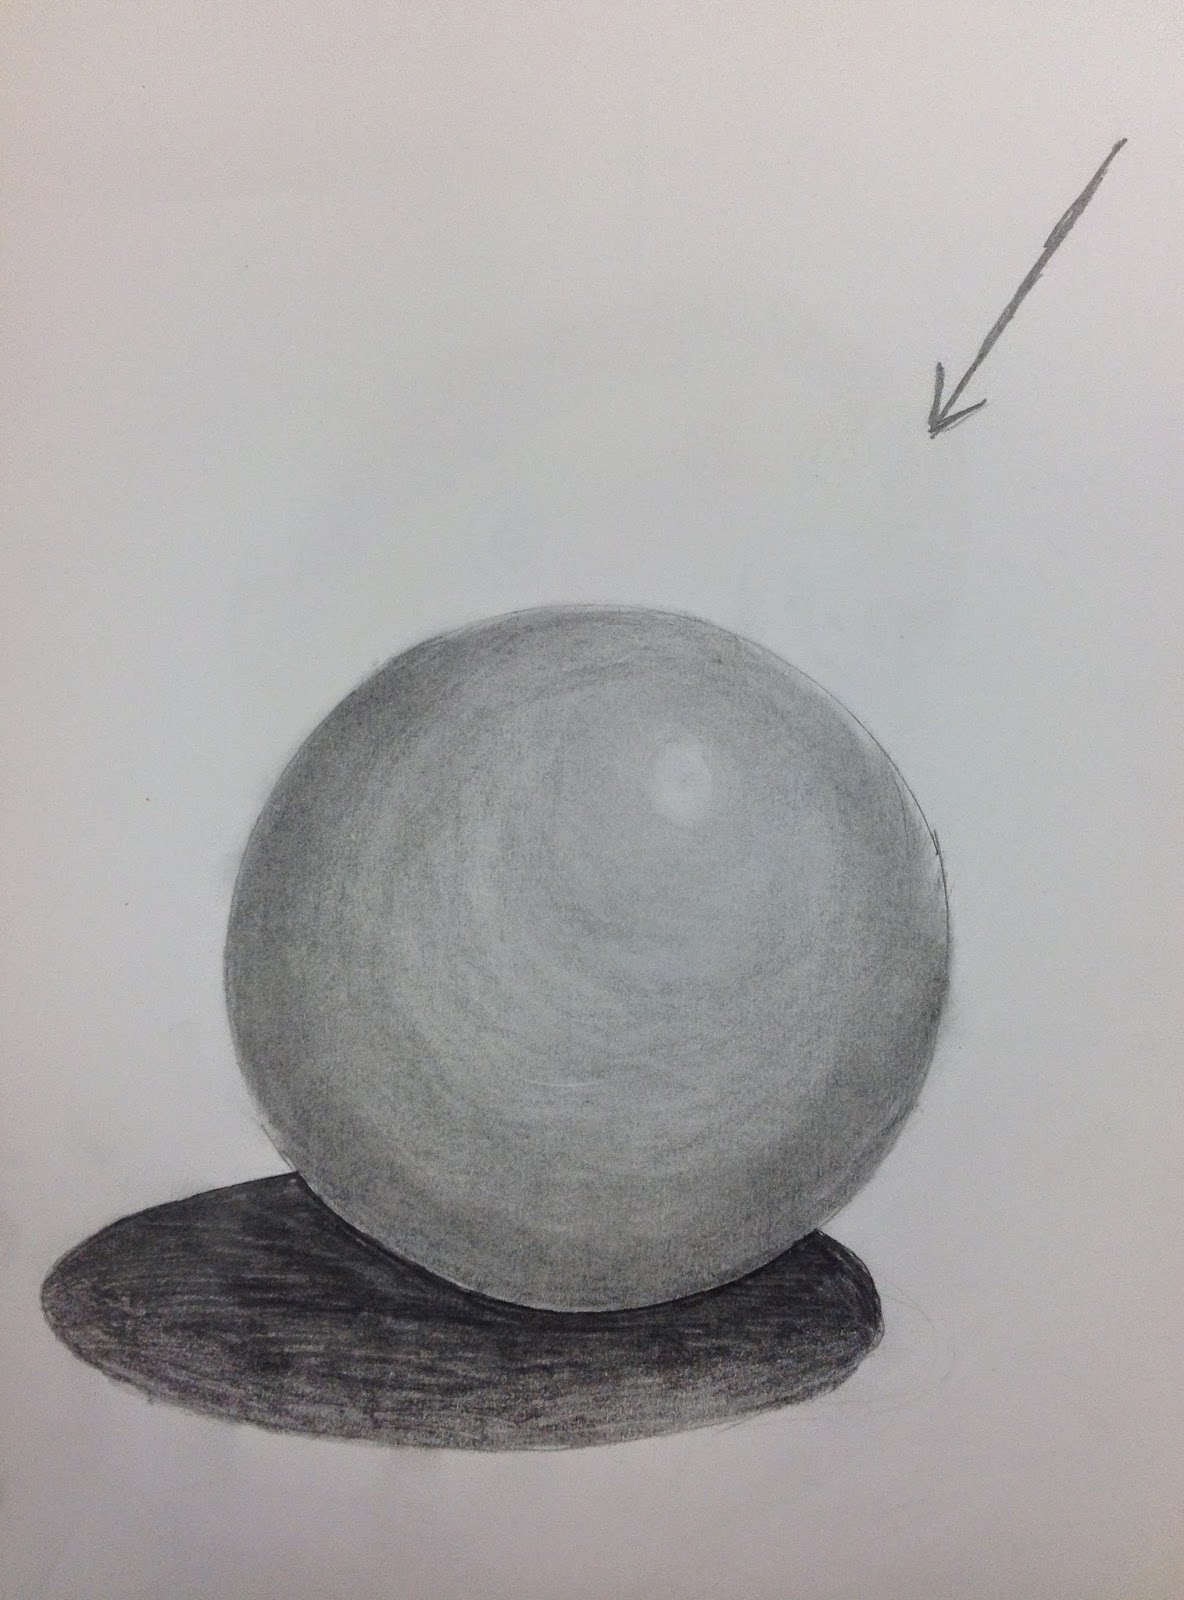
8th Grade Sphere Drawing With Shading and Blending
8th Grade Sphere and Shadow Study
We started out by drawing spheres.  I set out a ball and we noted where shadows were and reflections. Then I put it away and we had to think about it a little bit more.  Where is our light source (pick one)? Where is going to be the lightest spot on our sphere?  How about the darkest?  Etc.  I showed them how to use their pencil in the direction of the curves to accentuate the item's shape and then taught them blending with their finger or a tissue.

Once our spheres were complete, we discussed how that same concept can be applied to anything three-dimensional.  We talked about the high points on our face (cheekbone, forehead, nose and chin) and how/why highlights would fall there.  We talked about the areas with the most shadows and why as well as where middle grey/medium shadows would be.  We also discussed hair and how it is actually individual strands growing from the scalp and not perfectly smooth and colored in solidly.  I reminded them of using their pencil in the direction of the curve on that part of the face and encouraged them to use the sides of their pencils for ease of blending.  We don't have a class set of blending stumps nor shading pencils, so each student was working with their standard #2 and armed with a Kleenex and/or their fingertips.
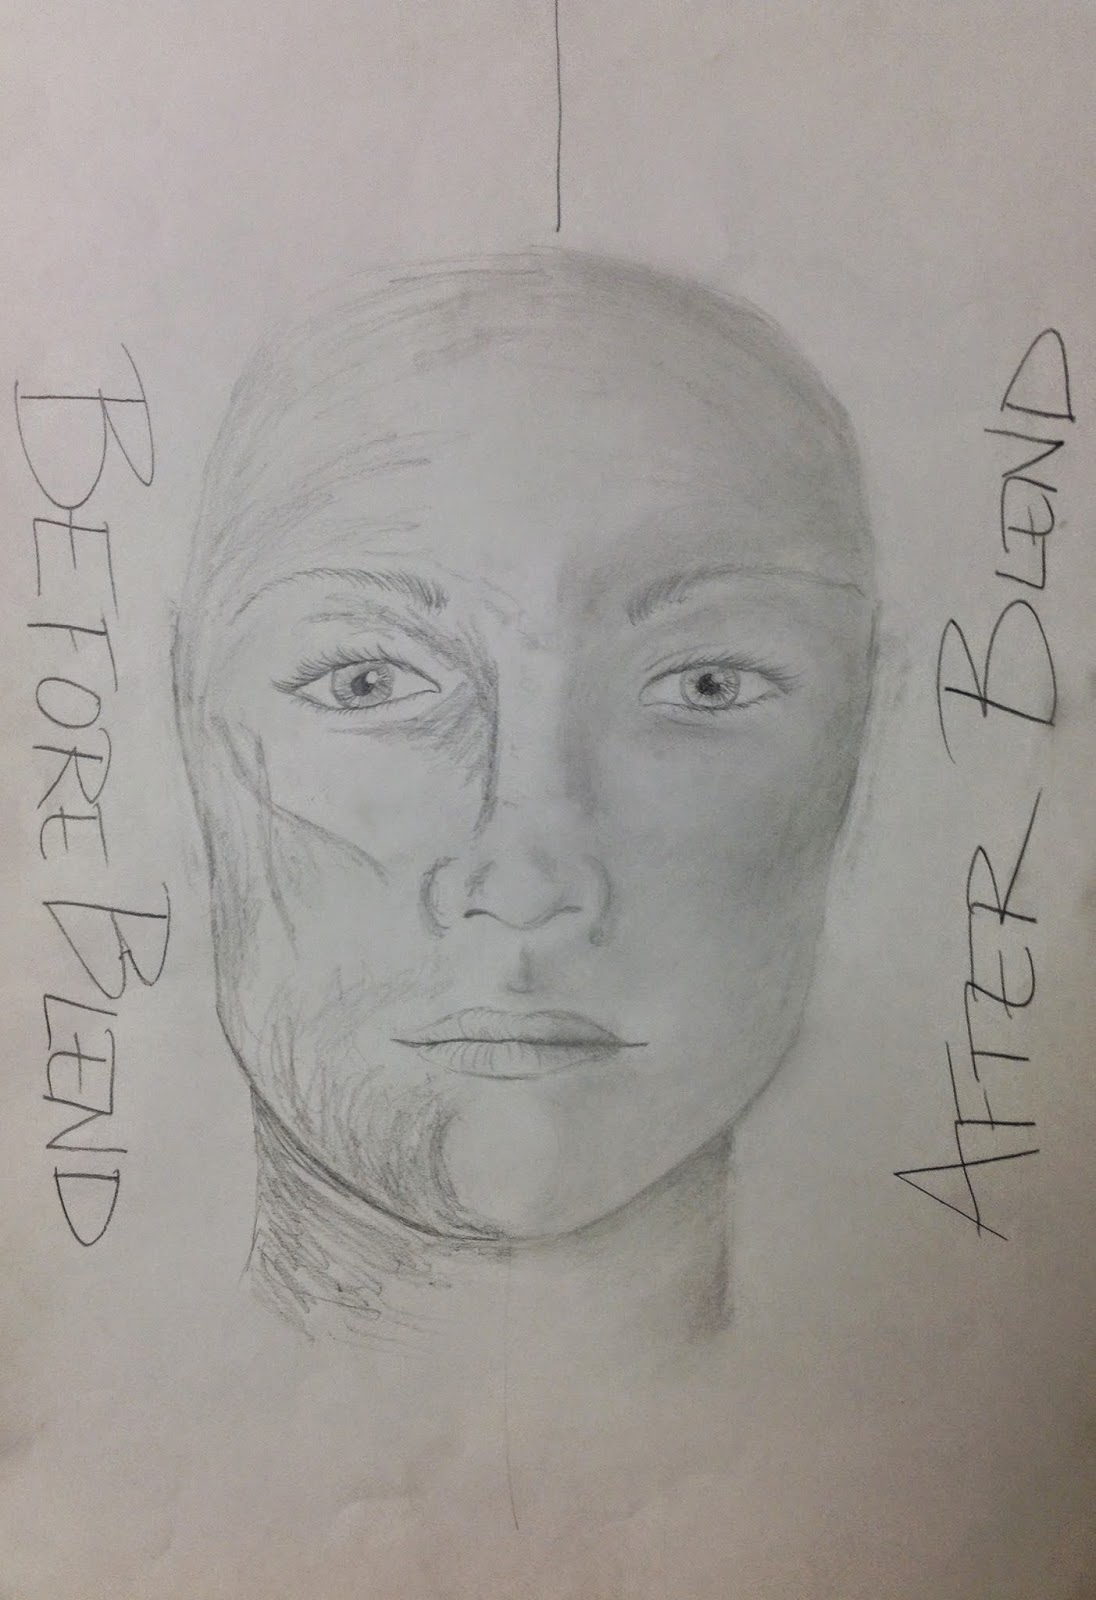
My demonstration example of how shading a face can look before and after blending


8th Grade Portrait Drawing Art Lesson

8th Grade Portrait Drawing Art Lesson8th Grade Portrait Drawing Art Lesson 


8th Grade Portrait Drawing Art Lesson

Once we had covered portraiture...we got into the collaboration!  I work at a K-8 building, and our 8th graders are each assigned a Kindergarten buddy.  The idea is for the 8th graders to show the kindergarten kiddos the ropes and make the little guys feel comfortable in the building and they end up forming these adorable bonds!  This collaboration project was inspired by one of those popular articles that floats around Facebook.  In this blog entry by the artist/blog Busy Mockinbird, an artist and mother discusses and shares images that are created out of collaboration with her four year old.  To cut to the chase, the results are absolutely amazing!  And I wanted my 8th graders to do something similar with their buddies.  

So after we learned about portraiture, I shared my idea and the article with my 8th grade and had each student draw a medium sized head on a blank page in their sketchbook.  The next time that Kindergarten came to art, they were taught about collaborative art and how they were going to be working with their 8th grade buddy (I don't teach the kindergartners Art, but I stopped in and found them cheering at the idea of working in their 8th grade buddy's sketchbook).  And thus, our collaboration portion of the lesson...
Collaborative Art with 8th Grade Portrait and Kindergarten Body Art Lesson

Collaborative Art with 8th Grade Portrait and Kindergarten Body Art Lesson


Collaborative Art with 8th Grade Portrait and Kindergarten Body Art Lesson


But wait, there's more!  After the kindergartners added bodies to our 8th grade faces, they drew a face on another blank page in their buddy's sketchbook.  On which, of course, I had my 8th graders add bodies and backgrounds!

Collaborative Art with Kindergarten Portrait and 8th Grade Body Art LessonCollaborative Art with Kindergarten Portrait and 8th Grade Body Art Lesson

Collaborative Art with Kindergarten Portrait and 8th Grade Body Art Lesson


Collaborative Art with Kindergarten Portrait and 8th Grade Body Art Lesson


Thursday, February 6, 2014

Fourth Grade Robots

Robot Paintings with Value and Color Mixing

Fourth Grade Color Mixing Value Robots

I got this lesson idea from Deep Space Sparkle who was inspired by John Post and a blog entry he had.  I absolutely loved the concept and had been brainstorming how I wanted to use paint and color mixing with my fourth graders.  I followed a similar path as John Post and Deep Space Sparkle, and I had the kids make a list of robot characteristics on the board.  Afterwards, I sent them back to their seats and they each drew their Robot on a 12"x18" sheet of paper (I let them choose from white, grey and blue paper).  I had them paint the outline in black and that was all that we had time for that class period.  

In our next class together, we recapped what we were doing and how we were going to paint them.  I wanted them to use mostly grey and explained "value" so that they understood that we would be adding highlights and shadows to our paintings.  I explained how we would paint, paint mixing and how to mix colors directly on the paper.  During my paint demo, we discussed how to make grey and made some guesses as to what would happen when we added a little blue or red to the grey (the kids guessed correctly!).  I was only giving them white, black, blue and red paint (I encouraged that red and blue mostly be for accents as we wanted to use mostly grey for our highlights and shadows later).  I reminded them that we would draw small details on our robots later, so for now, we just wanted to fill them in.  The kids did a great job!  Some of them had really small details they wanted to include, which was a small struggle, but all in all, they were able to paint their robots with ease.  As they were finishing "filling in" their robots, I had them pause what they were doing and we talked about value.  The kids were able to identify what areas would probably be lightest (or shiny) and which would be darkest with shadows.  They were also quick to point out that we should use white paint to show the shiny parts (highlights) and black paint to show shadows.  And the kids who mixed in blues and reds, were able to figure out that they could add blue or red to their black paint to get a navy blue or maroon shadows.  

In our last class of working on this, we drew small details directly on our robots using permanent marker.  I gave them black and red markers for this task.  This did not take them the entire hour we had together so I 
also started them on another project.  The robots came out hysterically!  I love how many kids wanted to make sure that their robot had a self-destruct button ("just in case") and how many of them doubled as vending machines.  Their creativity never ceases to amaze me.  
Fourth Grade Color Mixing Value Robots

Fourth Grade Color Mixing Value Robots

Thursday, November 21, 2013

Group Grid Drawing

Break it down...

I teach each middle school grade level for one trimester and as my time with 7th grade was winding down, I realized I hadn't taught "value" yet and I hadn't done any realistic drawing.  But as I mentioned, my time with them was coming to a close so I had to act fast.  I had originally planned on having each student complete a grid drawing assignment so I decided to adapt that lesson to fit my last two days of class with this group of kids.
Student-made Value Scale

I started by teaching the meaning of "value" in art and clarified that it had nothing to do with the price of artwork.  After a short discussion each student made a small value scale showing 9 variations of grey in their sketchbook.  I then introduced them to the concept of using a grid to replicate an image (whether it is on the same scale or larger...or even smaller).  We focused on figuring out and matching spacial relationships, placement and value.  We went from images gridded into 1" squares to drawing them onto 4" squares.  Earlier in the week, I took a photo of our school principle and vice principle and did the 1" grid for the kids, I also cut up the photos and numbered the backs of each square.  Each student completed at least 2 squares and found  where their drawing was to go on my large grid.  They didn't know who or what they were drawing but they loved trying to guess the entire time (and I refused to tell them if they were right or wrong).  As the pieces were getting glued onto the larger grid, they had it figured out!  But a lot of them were being hard on themselves since the results weren't realistic.  I reminded them that 75 different people were trying their best to replicate small squares onto large ones, and they weren't going to come out perfect.  And the fact that they knew who the images were, showed how well they actually did.  Even though, they aren't the most realistic portraits, I am very pleased with how hard they worked on matching spaces with simple shapes, line and value!
A few of the squares "went missing" at the end of the last day, so Mrs. Raes is left slightly unfinished