Showing posts with label Foam Printing. Show all posts

Wednesday, May 11, 2016

Animal Prints

Let's Get Wild!

Fourth Grade Animal Printmaking Art Lesson
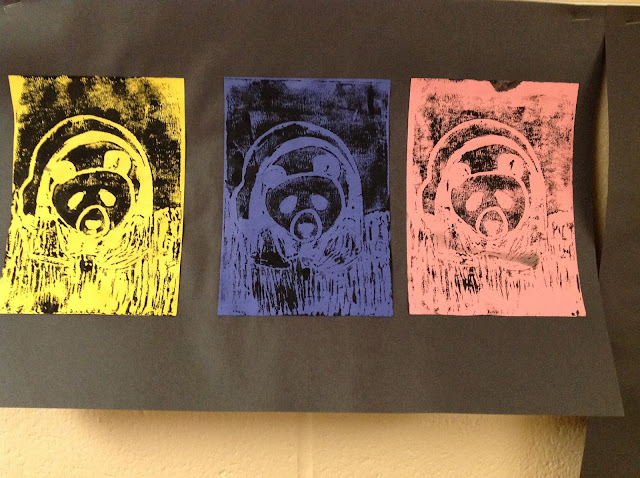
Panda Bears
My fourth graders tried their hand at printmaking and I love the results!  We started off by drawing from observation.  I borrowed a crazy amount of wildlife and animal books from our school library to give the kids plenty of options and I encouraged them to focus on drawing what they see instead of our usual, draw what we think something looks like or want something to look like.  This was tricky for some kids who have developed a fondness for cartoon drawings and simplified images, but they all tackled the challenge and had great drawings!

We had made the drawings on 5"x7" paper (that I had pre-cut) and then used pencils to transfer them onto identically sized foam.  I made sure that they first traced their drawing with the foam underneath their drawing before removing the paper portion and really pressing into the foam with their pencil.  I really remind the kids to press into the foam and tell them not to worry if it rips (since the foam we were using was pretty thin) but to try to keep it all in one piece.  

Once they were finished with making their "stamp" for printmaking, I let them choose their colored paper.  I asked that they choose three different colors of paper (that I had also cut to 5"x7") and put their name on the backs so we could find them easily on the drying rack.  Now it's time to print!

I demonstrated how to roll ink with a brayer (the kids love the brayers!) and to get the right amount of ink on the brayer by lifting it each roll so that the ink covers the whole thing, not just one small section.  I ask that they roll the ink out with the brayer until it looks like snake skin so they don't get too much or too little on their stamp.  I demonstrate how to roll the ink onto the foam and let them know that it's okay if they need to get more ink to cover their whole stamp.  I encourage them to work fairly quickly so that the ink doesn't dry onto their stamp, just in case they rolled on a thin coat.  I showed them how to flip their stamp onto their colored paper and to rub/press the entire back of the stamp to get a good transfer.  Then all they have to do is repeat the process three times to get our prints!  We put the prints on the drying rack and during our next class period, we started the day off by choosing at least two of our prints to glue to a black sheet of construction paper.  

Let's talk troubleshooting:  A lot of the kids still don't press hard enough into the foam to get a good print.  So if they are unhappy with the outcome, I let them wash the foam off and go press their drawing into the foam deeper.  Then they get to try printing again.  I also let them know that it's okay if a print or two doesn't come out well.  They can always try again, that's the beauty of printmaking, is that it can be done over and over again and you can make adjustments accordingly until you're happy!

Now for the examples!

Fourth Grade Animal Printmaking Art Lesson
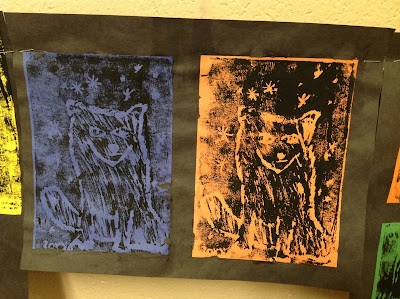
Wolf Prints

Fourth Grade Animal Printmaking Art Lesson
Woodpecker Series

Fourth Grade Animal Printmaking Art Lesson
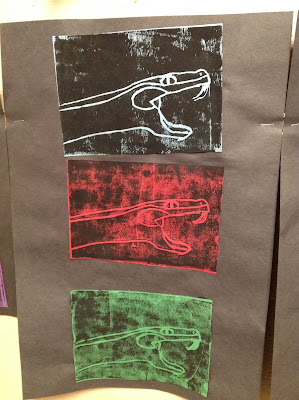
Snakes Attack!

Fourth Grade Animal Printmaking Art Lesson
Hanging Monkey

Fourth Grade Animal Printmaking Art Lesson
All the Pretty Horses

Fourth Grade Animal Printmaking Art Lesson
Bear in the Woods

Fourth Grade Animal Printmaking Art Lesson
Cartoon Cat

Fourth Grade Animal Printmaking Art Lesson
Elephant Mama and Baby

Fourth Grade Animal Printmaking Art Lesson
Puffin!

Friday, April 18, 2014

Complimentary Color Printmaking

Complimentary Color Printmaking Animal Art Lesson

I wanted my 5th graders to experience printmaking and I found an excellent lesson to be inspired by, here on another blog: Thomas Elementary Art.  While I must admit, he had greater success with his 4th graders on this lesson, I was still pretty pleased with our results, plus I gave them some free/experimental printmaking time at the end.

After I introduced my kiddos with the concept of printmaking, complimentary colors and I showed them some examples we started with our animal sketches on paper.  I provided them with plenty of books for them to use as guides when drawing their animals and encouraged them to draw largely and focus just on the head.  We sketched our animals and with a dull pencil (sharp ones will rip through the paper) traced them on top of a sheet of foam (same size as paper we sketched on).  Once they were traced, we removed the paper and pressed harder into the foam so that our animal stood out.  Now it looks like a stamp!


We used the back of our stamps to get solid color printed onto our paper for background colors.  I was running low on printing ink, so we printed with acrylic paint but we still used brayers/rollers.  I pointed out that we would need to press evenly on the foam to maximize how much paint transferred from the "stamp" to the paper and I reminded them that one of our prints would be done in complimentary colors and the other was a free choice.  The acrylic paint dries so quickly and we were transferring most of the paint onto our background papers, so there wasn't an issue with using two different background colors on our foam.
Cut Foam Printing Option (after use--obviously)
The next class period, I gave my students options.  They could cut out their animal from the foam and use the brayers, use a paintbrush to add color to their animal and/or background of the stamp or roll the brayer across their entire stamp for various printmaking effects.  I reminded them again that one of their prints had to be completed in complimentary colors and the other was free choice and I set them to work!

If they finished early, I allowed them a smaller piece of foam to make a free choice print, or they could continue printing with their animal stamp onto colored paper.  It was fun to see them take what they had learned about the stamps-- the ones who struggled were even making comments like, "this time I am going to press harder" or "I'm going to draw this bigger so that you can see all of the details."  I love hearing them talk about what they learned, especially when I know they struggled or were unhappy with their results.  It shows that they aren't hung up on the product, but the process of getting there!

Photos of the finished work (with some close ups):

Complimentary Color Printmaking Art Lesson
Turtle!


Complimentary Color Printmaking Art Lesson
Duck

Complimentary Color Printmaking Art Lesson
Lion

Complimentary Color Printmaking Art Lesson
Woodpecker (print pictured with foam piece)


Complimentary Color Printmaking Art Lesson
Hummingbird


Complimentary Color Printmaking Art Lesson
Dove


Complimentary Color Printmaking Art Lesson
Owl (print pictured with foam piece)


Complimentary Color Printmaking Art Lesson
Hummingbird--this student experimented a lot with her print and I LOVE how her foam ended up; her foam stamp is the bottom piece!

Complimentary Color Printmaking Art Lesson
Elephant, Cat and Badger (prints pictured with foam pieces)

Complimentary Color Printmaking Art Lesson
Cat


Complimentary Color Printmaking Art Lesson
Monkey

Complimentary Color Printmaking Art Lesson
Elephant

Complimentary Color Printmaking Art Lesson
Dove, Baby Monkey Drinking a Bottle, Turtle and Mouse (print pictured with foam piece)

Close up of the baby monkey drinking a bottle

Complimentary Color Printmaking Art Lesson
Fish with Bubbles

Complimentary Color Printmaking Art Lesson
Lizard Print with Cut Stamp

Complimentary Color Printmaking Art Lesson
Butterfly

Complimentary Color Printmaking Art Lesson
Deer (print pictured with foam piece)

FREE CHOICE PRINTS!
Free Choice Foam Printmaking Art
Prints and Foam Stamp

Free Choice Foam Printmaking Art
The prints of this one didn't come out very well, but the foam stamp is beautiful on its own!

Free Choice Foam Printmaking Art
Turtles, Easter Bunny and Palm Tree prints

Free Choice Foam Printmaking Art
This guy makes me giggle

Free Choice Foam Printmaking Art
This student cut up her free choice foam and made a series of stamps to create an outdoor scene

Free Choice Foam Printmaking Art
Domo

Free Choice Foam Printmaking Art
Fun with Line and Pattern!

Thursday, October 17, 2013

Dia de los Muertos

Day of the Dead Ofrenda

Fourth Grade Day of the Dead Foam Printing Skulls

It's that time of year again, time for the skeletons to dance and skulls to be adorned!  Day of the Dead (actually two days) is on November 1st and 2nd, so Mrs. Grabau (K-3 Art) and I have teamed up with Mrs. Buckmiller, our Spanish teacher to create a Dia de los Muertos ofrenda with our students!

An ofrenda is simply an offering table where you can create a colorful display to honor and celebrate the life of dead loved ones.  Traditional decorations include skeletons (known as calacas), skulls (the kids beg to do sugar skulls but I am not ready to take that on), decorative paper flags (papel picado) as well as photos of who the ofrenda is for and some of their favorite foods and/or objects.  Each grade level contributed to the ofrenda and it looks outstanding! 
School Day of the Dead Ofrenda


With my fourth grade students, I created skull prints using scratch foam.  They started by sketching out their skulls in simple shapes and then filling them with decorative lines and shapes as well as addressing the background.  We traced over our sketch with a sheet of foam underneath it to transfer the idea.  Then removed the sheet of paper and traced over it directly on the foam to really make sure the various shapes and lines were indented.  The students got to choose what color of ink they wanted to print with and on what color of paper.  As you can see, they are beautiful and so creative!
Fourth Grade Day of the Dead Foam Printing Skulls


My fifth graders created papel picado.  We talked about symmetry and how to cut our symmetrical shapes from paper.  For this particular activity, I gave my students four templates to choose from.  Three of which I drew up based on other ideas I had seen before and one of them was found here but later I also found these ones too.  I divided up the templates into three categories--easy, medium and hard.  I let my students select their own ability level, though when the students who chose 'easy' finished early, I asked them to try a 'medium.'  They simply folded a sheet of paper (their color choice) inside of the template and cut along the lines.  They were all pretty pleased with their work and were surprised at how challenging it was to cut out some of the pieces.  I love how they look all together!
Fifth Grade Papel Picado Templates

Fifth Grade Papel Picado

My seventh graders did a couple of things for the ofrenda.  For the entire month of October (and even at the end of September I think), whenever they finished an assignment early, I asked them to paint on some bones.  Though they aren't ordinary bones, they are milk jug bones!  I have seen milk jug skeletons around for quite awhile but had never made one myself.  So I decided that as students finished up early, they would paint on a part of the skeleton in honor of Day of the Dead.  I simply reminded them of the holiday, it's purpose and how it is a bright and colorful holiday.  I encouraged them to layer paints and designs (yes, you are actually supposed to paint on top of someone else's painting this time!) and to play with color.  I couldn't be happier with how they turned out!  Once we finished assembling the first one, he was dubbed Senior Huesos (Mr. Bones) and he graced our presence in the art room until the ofrenda was assembled.   We have a few others in the works, but so far Senior Huesos is repping the ofrenda alone.  But I gotta say, Day of the Dead milk jug skeletons are the way to go!

Day of the Dead Milk Jug Skeleton


My seventh graders also took on an assignment which satisfied a personal obsession.  They made Day of the Dead dioramas!  My absolute favorite booths at every art festival I attend, are Day of the Dead themed artwork with the boxes filled with elaborate scenes and details!  I just adore the tiny scenes and all of the colors melding together!  I shared this obsession with my students and some of them even agreed with me about how impressively cool they are.  I showed them a PowerPoint I created about them and we discussed their various qualities of each diorama.  We also discussed assemblage art and how they could use any number of items I had in the classroom as part of their scenes or bring in objects of their own.  The students then chose to work either alone or with a group (no more than 4 per group); however, I reminded them that with a group, I expected more detail and more elaborate scenes than those working alone.  We used air dry clay for our skeletons (in the future I will use model magic, as the air dry clay is brittle--it IS clay--and we keep losing limbs and will need lots of epoxy!) and a random assortment of materials for everything else!  I can't help but smile every time I think about this project.  While they aren't quite finished yet, they are simply amazing!  I will be sure to post photos as soon as they finish!
Middle School Day of the Dead Diorama Art Lesson