Showing posts with label Sculpture. Show all posts

Wednesday, March 21, 2018

Plaster Masks

Plaster Mask Fifth Grade Art Lesson
Fox Inspired Mask
I love all things sculpture!  I love the different "hands on" approaches the students have to take and the variation that we get as a result!  This lesson is no different.  I usually try to teach this lesson around Mardi Gras and we talk about masquerade masks and how they can all be so different and lively.  We focus on shape variation as well as decorative detailing. 

For the actual creation of the masks, I allow the students to make a choice.  They can 1)use a face mold to build their mask (using plaster strips and water) on top of or 2) drape their face-or a volunteer friend's face-with a strip of saran wrap so as not to cover the nose (we have to breath) and they can build their mask on their friend's actual face or draw out a plan and have their friend build it on their face for them.  Either way, each student has to create a mask.  It is just up to them how messy they want to get and how much they trust their friends with plaster!  Option two requires students to work a little faster since both friends need time to build a mask, but so far that hasn't been a problem.  The next time I see the kiddos (this is a 2 class period project), their masks have dried and hardened and are ready to be painted and adorned.  I let the students paint and decorate their masks however they would like.  I help the students hot glue the feathers on but otherwise, it is all up to them.  I never seem to remember to take enough photos but here are a few that I can brag about (and give you the general idea from)
Plaster Mask Fifth Grade Art Lesson

Plaster Mask Fifth Grade Art Lesson

Plaster Mask Fifth Grade Art Lesson

Mehndi Hand Sculptures

Mehndi Hand Middle School Art Lesson

I love cross curricular teaching and this lesson allows me to work with our 6th grade religion/social studies teacher.  While she teaches about Islam, I introduce the kids to the beautiful world of Mehndi!  Another art teacher found this lesson through Dick Blick and I adapted it and made it one of my favorite lessons to teach (who am I kidding--I say that about all of my lessons; I can't pick just one favorite!). 

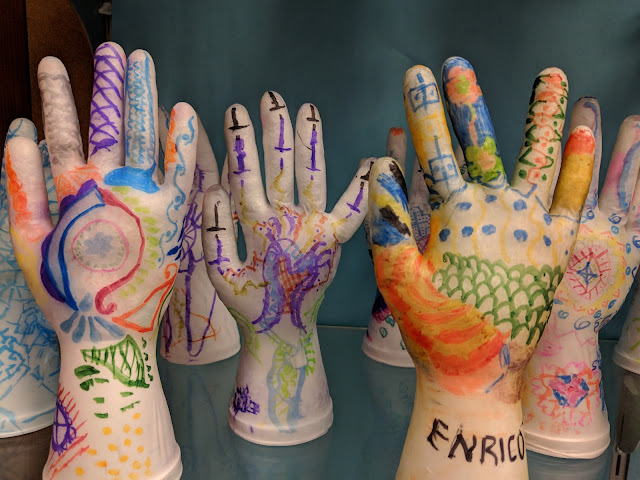
I introduce the students to the history and significance of mehndi.  Most of the students have no idea what I am talking about when I first use the word "mehndi" but as soon as I start my slideshow and it has a photograph of an adorned hand, I have tons of people go "Oh! I know that!  I always called it 'henna' instead!"  And then I get into how henna is the medium and mehndi is the art...yadda yadda yadda...BAM!  We're creating our own on vinyl gloves! 

Mehndi Hand Middle School Art Lesson

I have the students create some patterns and radial designs in their sketchbook first, so that they have some ideas to start with.  Then I teach them about creating a flow between patterns and designs via color and interaction.  Once they have a jumping off point I have them work while wearing the glove as an added challenge.  It requires them to be more careful and mindful with their mark making since they are working on a 3D surface.  Once they have their glove designed, I have them stuff the hand with a polyester fill and a small (upside down) cup so that the glove can stand.  The results are amazing! 
Mehndi Hand Middle School Art Lesson

Mehndi Hand Middle School Art Lesson

Mehndi Hand Middle School Art Lesson

Gestural Sculpture

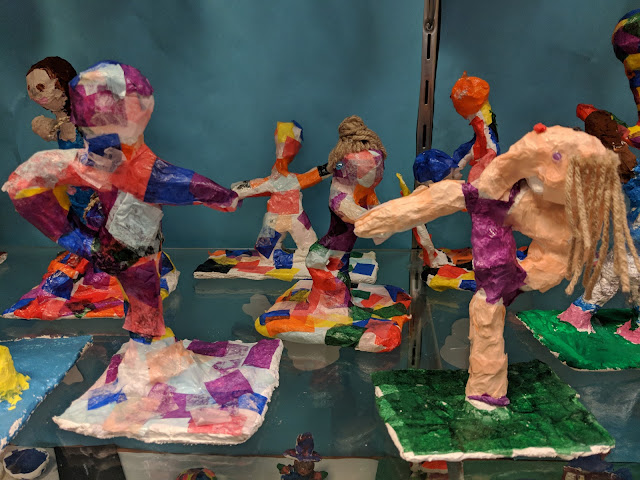
I love creating sculptures with my kiddos!  It is always fun and exciting for them as well as it is for me.  They come up with such great ideas and I love seeing them try out a new medium.  For my fourth graders, working with plaster is new and exciting.  We make gestural sculptures that imply movement and they all come out so fantastically unique.  For a detailed description of the lesson itself, check out my post from 2014 here

Otherwise, just enjoy these fabulous creations from this year:
Gestural Plaster Sculpture Fourth Grade Art
An eclectic dance party--someone dabbing alongside a hula dancer!

Gestural Plaster Sculpture Fourth Grade Art
We had our fair share of dabbing sculptures this year

Gestural Plaster Sculpture Fourth Grade Art
Breakdancing, dabbing, handstands, hockey players...we've got it all!

Gestural Plaster Sculpture Fourth Grade Art

Gestural Plaster Sculpture Fourth Grade Art
Mario!!!!  We also have a dancer doing the splits with troll hair behind him!  These kids are so creative!

Gestural Plaster Sculpture Fourth Grade Art

Gestural Plaster Sculpture Fourth Grade Art

Art Club


I've fallen really far behind on my blog (mostly because I use a lot of the same lessons and it is easier to justify not updating photos of new work) but I recently realized that I never show off what we are doing in Art Club.  I work at a K-8 building but I only open Art Club up to my middle school kids (6th-8th grades).  We meet every other week and the way I have it set up, I will always propose a lesson/project but they are not required to participate.  Should they choose to opt out of my lesson, they need to come up with their own art project.  As long as I have the materials, I let them do whatever project they have come up with.  But most of the time, they participate in my lessons.  I keep instruction a little more minimal because I want them to have more freedom in their making and ideas, some of them really take off with this and others request more guidance and structure.  Enough about how I run the club, let me show off what they've been up to--brief descriptions of the process below each set of photos!


foil sculpture art project

Foil Sculpture:  Creating a small sculpture from foil; examples above are: a squirrel with acorn, eagle/hawkman, Pikachu, and a dancing woman.  This was actually more of a challenge to the kids than I had anticipated.  Getting them to figure out how to manipulate the foil was a good problem solving task for them!


Tile Marbling Art Project

Tile Marbling Art Project
Marbled Tiles:  permanent marker drawn onto ceramic tiles, use eye droppers of Isopropyl Alcohol (thank you science room for beakers and eye droppers!) to put a few droplets of alcohol onto the drawing and watch the magic happen!  They change so much as they dry, it is amazing!

Packing Tape Sculpture

Packing Tape Sculpture
Tape Construction

Packing Tape Sculpture
Tape Party in the Kiln Room

Packing Tape Sculpture
Throwing snowballs

Packing Tape Sculpture
Spiderman Tapeman

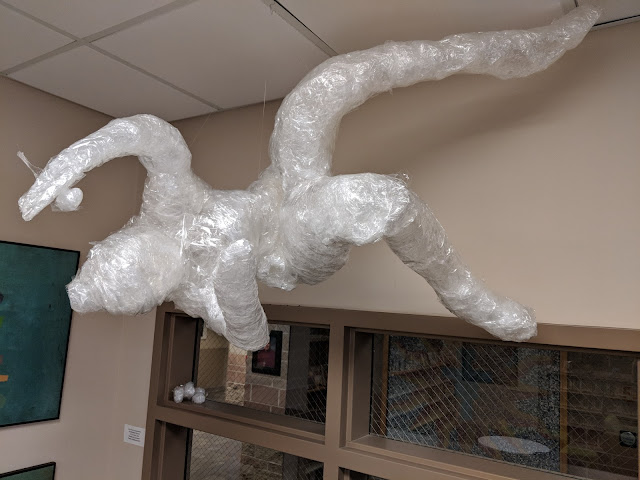
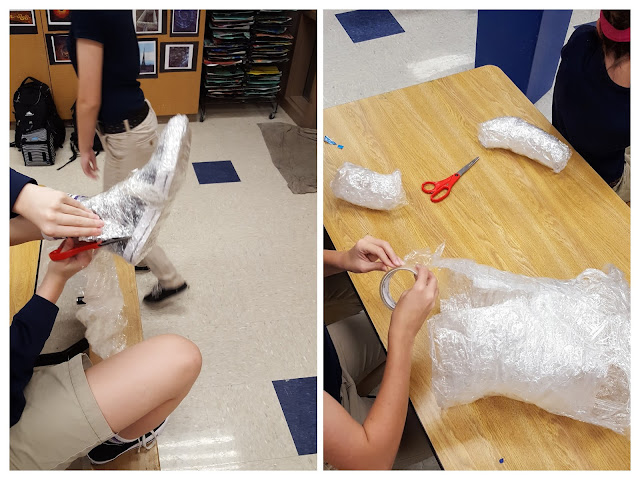
Tape Sculptures:  Art Club members created their own groups and worked together to form their sculptures piece by piece.  They started with saran wrap-one layer per body part- then wrapped the same area in multiple layers or clear packing tape.  They carefully cut themselves out of each piece and retaped the body part back together where it was cut.  Once all body parts were created, the entire sculpture was taped together and formed. We then hung them in the library of our school to show them off.  (The party in the kiln was a bonus for the sculptures, they didn't actually stay there for long)

Last Art Club of the Year Activities:
Art Rug, Bubble Paint, & Tie-Dye!

I cut up a bunch of tshirts and bought some Latch Hook fabric/mesh.  I asked the students to write me a message or draw me a picture on a t-shirt strip then tie it onto the mesh so that I can have a rug filled with love and art!


Bubble paint!!!  This activity kept popping up in my Facebook newsfeed and I'm so glad it did.  I loved it and so did my kids!  I had them make their own bubble blower with a waterbottle (cut in half), some vegetable mesh/bag, and some tape.  The bubbles are a soap, glycerin combo with liquid watercolors added in.  So fun!  Too bad it was raining outside, we would have made a bigger mess had it been possible!

Bubble Paint!

Bubble Paint!

Tie-Dye!  I love ending the year with tie-dye...it's always an Art Club favorite!  Pretty self explanatory.  Again, I wish it wasn't raining because this is best done outside (for easier clean up)


Thursday, November 17, 2016

Clay Extravaganza!

Clay Clay Clay!

I've posted about my various art lessons in more detail in the past, so I'll just repost the links to those and share the photos of the great things my kiddos made this year

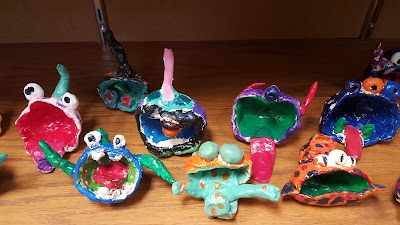
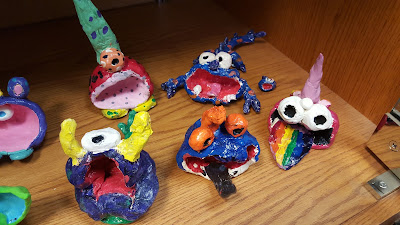
4th Grade-Pinch Pot Monsters
Fourth Grade Pinch Pot Clay Monsters Art Lesson

Fourth Grade Pinch Pot Clay Monsters Art Lesson
I had to get a close up so you could see this guy's tail!  Love the details these kids come up with!

Fourth Grade Pinch Pot Clay Monsters Art Lesson

Fourth Grade Pinch Pot Clay Monsters Art Lesson

Fourth Grade Pinch Pot Clay Monsters Art Lesson

Fourth Grade Pinch Pot Clay Monsters Art Lesson
Same group, just closer so you could see their details from a different angle

Fourth Grade Pinch Pot Clay Monsters Art Lesson

Fourth Grade Pinch Pot Clay Monsters Art Lesson
The green guy reminds me of a modern Gizmo!

Fourth Grade Pinch Pot Clay Monsters Art Lesson

Fourth Grade Pinch Pot Clay Monsters Art Lesson
The turquoise monster is holding fire in each hand...such a creative idea!

Fourth Grade Pinch Pot Clay Monsters Art Lesson

Fourth Grade Pinch Pot Clay Monsters Art Lesson

Fourth Grade Pinch Pot Clay Monsters Art Lesson

5th Grade- Clay Pinch Pot Characters
In 5th Grade, I allow for a lot more freedom with their clay creations, but I still want them working with pinch pots to get that basic clay technique down.  I love the range of ideas the kids have!

6th Grade- Clay Terra Cotta Warrior Sculptures
http://missartypants.blogspot.com/2013/03/terra-cotta-warriors.html I actually have multiple links to this lesson for various examples and years that have made these, but this is the link that shares the bulk of the lesson

7th Grade- Hollow Form from Pinch Pots
Similar to the 5th grade lesson, I let the kids decide what they are going to make almost entirely.  I just ask that it be made from two pinch pots that create a hollow form and that they add attachments so that they can practice the slip and score methods for strong attachments and an awesome chance to show off their creativity and interests

8th Grade- Clay Boxes (slabs and cylinders)
This year we still made slab boxes but they had to be cylindrical.  I originally said they had to use cylinders because it was a faster process than cutting a bunch of square/rectangular slabs, but I might stick with the cylinders in the future just because I really enjoyed seeing the kids work this way.

Thursday, May 1, 2014

Gestural Sculpture

It's all about movement

Fourth Grade Wire - Foil - Plaster Gestural Sculpture Art Lesson
Hula Hooping, Jumping Rope and a Ballerina
As usual, I started my lesson by asking my kids questions.  I told them we were going to make gestural sculptures and asked them what they thought we were going to make and what "gestural" means.  I had a photo example up of what we were going to do, so they were able to use context clues.  After a few guesses, someone pointed out that you use your hands to make gestures which lead me into my explanation of "gestural" meaning that it shows movement.  We also discussed "sculpture" but they knew that one right away!

We started off by making stick figure drawings (I normally don't allow my kiddos to draw stick figures but for this, I made an exception) showing some sort of movement.  I gave each student a piece of wire and after a quick demo, I asked that they try to recreate their stick figure with the wire.  Once we had wire people, I gave another short demo of how to wrap their wire person up in foil so that he/she became more three-dimensional.  I emphasized using large pieces of foil and crumpling them around the figure at various angles and overlapping pieces of foil to keep the body together. A lot of kids still wanted to use small pieces of foil, but they quickly found that small pieces fell off immediately and weren't adding any bulk to the body.  I let a few kids use some masking tape to keep their foil on/together, but most of the kids were able to squish the foil together to create a strong enough hold to get us to the next step.
Initial Steps for Making a Gestural Sculpture Art Lesson
First 3 Steps for Making a Gestural Sculpture
In our next step in the process, we added a base with some tape and then plaster.  I pre-cut a series of square and rectangular bases from foam core and cardboard (I just used scraps we had laying around the art room).  Each kid taped his/her tin foil sculpture so that at least one hand or foot was on the base (we used masking tape).

Plaster was new to my fourth graders and they weren't sure what it was, so we spent a little time where I showed them what it was and how it would work and the various stages we would put it through.  I used a cast for a broken arm/leg as an example of what this stuff was similar to.  This gave them a point of reference for what it looked like and how hard it could dry to be.  I order the product Plaster Craft by the roll (it's actually just long strips folded and stacked up in a 20lb box) and I pre-cut it into strips for the fourth graders.  I showed them its original state as a long strip ("Whoa!" was their response followed by lots of giggles and "oohs" and "ahhs") and how I had cut it up into smaller strips for them.  I showed them how the plaster was dried onto gauze and we would need to wet the chalky surface in order to use it to reshape and layer it and make strong sculptures.  I demonstrated the process of dipping the strips into water and then placing it onto my sculpture.  I emphasized to cover the foot/hand on the base first, using the plaster like the tape to stretch across the body and wrap around the base.  I asked them to start by covering the base and appendage first then work their way up the sculpture slowly.  It is important to use the strips in different directions for strength of the plaster structure and to rub the plaster to fill in all of the gauze holes so that painting them would be easier later. I let them feel a finished/dry sculpture so that they could understand how the plaster would dry (again, I referenced casts and their hard surface).
Plaster Step in Making Gestural Sculpture Art Lesson
Plaster Version of Gestural Sculpture
After our sculptures were dry and freestanding, I gave the students a choice.  They could paint their sculpture, or they could Modge Podge scraps of colored tissue paper to the surface.  I explained that they could make their sculpture realistic or decorative, that the important thing was just to cover the entire sculpture so that we didn't see the plaster anymore.  This gave us some added variety.  A few kids even chose to paint parts of their sculpture and then Modge Podge some tissue paper onto the rest!  The kids couldn't believe that these had started as wire stick figures!

Painting with Biggie Cakes Tempera Paint and using Modge Podge with cut tissue paper:


The sculptures came out great, and as usual, my only regret is that I didn't take more photos of them for the blog! The kids couldn't wait to take them home, so I ran out of time before too many had been photographed.  I had skydivers with parachutes, people doing kart wheels, various dancers and runners, the variety was tremendous!  But I didn't capture them all so here is what I can show off/brag about:
Fourth Grade Plaster Gestural Sculpture Art Lesson
Surfer

Fourth Grade Plaster Gestural Sculpture Art Lesson
Ballerina and Dog Walker

Fourth Grade Plaster Gestural Sculpture Art Lesson
Skateboarders (the one on the left had some touch ups done later, but this still shows off his sculpture)


Fourth Grade Plaster Gestural Sculpture Art Lesson
Soccer Players--one in Modge Podge with tissue paper the other, painted

Fourth Grade Plaster Gestural Sculpture Art Lesson
Jump Ropers (I know the one on the left was a repeat, but I wanted to show the different approaches with Modge Podge and those results)