Showing posts with label Egypt. Show all posts

Wednesday, January 8, 2014

The Mummy Games

With Your Host, Mrs. Heath-opatra


My students just finished their Egyptian mummy unit.  We followed similar steps to my lesson posted here and here last year.  And had equally awesome results.  But this year, since we ended our lesson right before winter break, I invented The Mummy Games for a bit of Egyptian inspired fun on our last day before we could sleep in for two weeks.  Unfortunately we had a late start due to poor weather and were already dismissing early, so I only had time with one of my sixth grade classes.  But they had a blast!  They were even reminiscing about it today (we just got back from break).

A run down of the Mummy Games:
  • I let the kids split themselves into 5 teams of 5 (if a team only had 4, it wasn't a big deal, they just had to make sure everyone participated)
  • I gave a brief rundown of how the games would go and what challenges they would face and what to expect (I gave each team a copy of the following and explained it a bit)
Mummy Games Rules/Task Handout-Guide
  • I had a line drawn on the floor with painters tape that each team started behind
  • The first task was to wrap up one team member in toilet paper so that they were mostly covered/wrapped up like a mummy
  • The mummy had to then walk without bending their legs and arms out in front of them (mummy-style) from the tape line down to my whiteboard which had enveloped labeled 1,3 and 4 taped to it
    • Each team had their own set of envelopes
  • The mummy grabbed envelope 1 for their team and raced back (still walking mummy-style) with its contents
  • The team found inside of their envelope instructions which lead them to building an Egyptian/Pharaoh's headdress (template found and printed from this site) which you can see me wearing in the photo at the beginning of this blog entry
  • Another team member had to wear the headdress and run to "The Nile River" and were warned to beware the crocodiles


    • Each team had their own Nile River which was a tub of water (tinted blue with tempera paint) and floating marker caps.  Inside one marker cap was the Pharaoh's treasure aka yellow beads glued inside; the Pharaoh (kid wearing headdress) had to find their treasure and bring it back to their team
      The Nile River
      The Pharaoh's Treasure (yellow beads glued inside of a marker cap)
      Crocodiles (googley eyes and sharpie on marker caps)
  • The mummy had to race back to the whiteboard to grab envelope 3.  Inside they found a message/instruction written in hieroglyphics which they had to decode with a legend, also found inside of the envelope

  • Instructions in hieroglyphics
    I highlighted the letters "E" and "I" since they used the same hieroglyphic.  The students had to use their better judgement when decoding
    • The deciphered message told them to mummify their pet dinosaur (a toy dinosaur and bandages were available and labeled as "3" on a separate table for them to grab and then mummify
  • The mummy raced and grabbed envelope "4" which included another hieroglyphics message
    • When deciphered, they were told to use the materials provided (cups) to build a pyramid around their mummified dinosaur and the Pharaoh's treasure
  • The first team to correctly decipher the messages and complete the tasks won!
All of the supplies (minus the envelopes /contents and Nile Rivers) on one table, and labeled per task given
It was such a great time!  The kids had a blast and were really good sports about the whole thing!  We had a little extra time at the end of the period and it was their idea to play hot potato with the remaining toilet paper and watch all of those who ended up in the middle get mummified by default...it was hysterical and I loved that it was their idea!
The Day of the Dead Skeleton Even Participated!

Friday, November 16, 2012

More Egyptian Mixed Media

Egyptian Mixed Media Continued...

More Student Examples of Egyptian Symbol Mixed Media

It's always so difficult for me to only post one or two photos of the kids' artwork.  These sculptures were so fun and unique, I wanted to share a few more with you.  I hope this inspires some creativity in your classroom or students' artmaking!

Various Egyptian Symbols made by Students with Mixed Media
Pictured above: The Egyptian God Bes, a Crocodile of the Nile, and a Crook and Flail

Various Egyptian Symbols made by Students with Mixed Media

Pictured above: Scarab Beetle, Anubis the Jackyl Headed God and an Aten

Thursday, November 15, 2012

Mixed Media Egyptian Symbols

Mixed Media Egyptian Symbols

Students Explore Mixed Media Sculpture Forms with Egyptian Symbolism

After finishing our mummies, I wanted the students to continue on with making their own decisions in their artwork while enlisting their creativity and problem solving abilities.  To continue our Egyptian studies, we looked at Ancient Egyptian Symbolism.  We discussed what "symbolism" means and how/where we find symbolism all over the world.  I presented them with some of the more commonly known Egyptian symbols and we discussed their meanings and uses.  I distributed a sheet of Egyptian symbols to the students and let them pick which one they would like to work with for this particular lesson.
Various Egyptian Symbols made by Students with Mixed Media
Above you will find an Egyptian Cat, a Djed Pillar and a Scarab Beetle

I introduced the students to the concept of medium and media as new vocabulary words.  I then took them on to discuss mixed media sculptures and how to consider different dimensions, sides and angles of their art can been seen.  The students rummaged through my boxes of mixed media (boxes filled with various donated items such as bottle caps, buttons, old jewelry, fabrics, pipe cleaners, cardboard, etc) and came up with their own plans.  They sketched out their symbol and labeled what each part of it would be made out of.  We then assembled them and got amazing results!
Various Egyptian Symbols made by Students with Mixed Media
Above you see Ibis, an Ankh and a Shen
 

Thursday, October 25, 2012

Ancient Egyptian Mummy Tales

Mummy Tales

Students Write a Biography to go with their Mummy Form

After the Sixth Graders accessorized their mummies, they wrote short stories about them.  Their basic requirement was to give a brief bio describing who the mummy was, what they were interested in and how they died (all while making sense with their accessorized mummy) as they incorporate an Egyptian reference or two.  I am constantly wowed by what they come up with, such creative minds!
Egyptian Mummy Art Lesson Plan with Writing
This particular mummy is accesorized with a monocle, bow tie and cane so his story was about being young and wealthy before dying at the clutches of a crocodile in the Nile River.

Here is another one of my favorites.  Her story was about Mummy Jordan (a bandage filled homage to Michael Jordan).  She even made a free standing basketball hoop and a ball out of a pom pom!
Egyptian Mummy Making Art Lesson Plan


Wednesday, October 24, 2012

Ancient Egyptian Mummies

Ancient Egyptian Mummies 

Students Create Mummy Forms with Modern Accessories

The Sixth Grade Social Studies teachers are currently covering Egypt and I jumped at the chance to introduce them to various Ancient Egyptian arts.  We started off discussing mummification and the steps and reasoning behind it.  The students loved taking this opportunity to share what they already know about mummies, tombs and Egypt in general (they especially like talking about how Egyptians removed a person's brain when they were to be mummified!).  We then set to make our own mummies with a modern twist.  We build foil body forms and wraped them in muslin that we cut into bandages and dyed various shades of brown with tea.  I got this idea from the Boise Art Museum where they had their own step by step process.  I used my own variation of this lesson, but the basic steps were the same. 
Egyptian Sculpture of Mummy Forms Art Lesson Plan

Step One: Build a Mummy Form from Tin Foil.  Some students used masking tape to hold parts together, others were able to use foil to hold form together

Step Two: (After cutting and tea-dyeing  the bandages) Wrap Mummy with various strips of fabric.  Add some school glue to the ends to keep wrap in place.

But as an art teacher, I couldn't just let our mummies all look the same tea-dyed brown, so for Step Three: we added personality to our mummies by creating accessories! Each student used mixed media to construct whatever accessories they felt necessary to make their mummy stand out. A lot of students made simple accessories like headphones and hats, and others constructed guitars and parachutes for their mummies. The creative juices were flowing and we had some great results. Here are a few of the finished mummies (these all happen to be musically themed, but there are quite a few other styles amongst the students). I'll be sure to post more photos as the kids finish up adding their details.
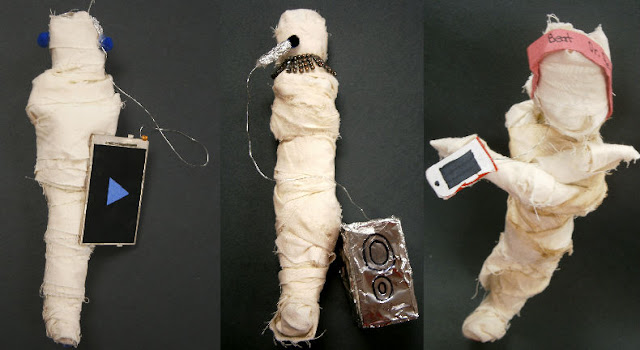
Mummy Sculpture Forms with Modern Accessories Art Lesson Plan

Tea Dye Troubleshooting: The mummies in the photos above are a lot lighter in color than the one pictured for "Step Two."  That is because I am new to tea dyeing and the class who made these mummies did not leave their bandages in the tea long enough.  I found that I needed to use many more tea bags to get the color right on this particular fabric and the bandages need to soak for a few days in order to really get that antique coloring.