Friday, September 28, 2012

Bring On The Bow Ties!

Our school celebrates every Thursday as "Bow Tie Thursday" where students and staff alike are asked to come sporting a bow tie. Quite a few students and staff have been known to go all out with their attire and I couldn't help but notice a few particularly appealing duct tape bow ties! One student in particular has been fashioning them out of various duct tape prints (who knew there was such a variety of styles and colors of duct tape) and I was fortunate enough to recieve my first duct tape bow tie. She even chose a 'splatter paint' themed duct tape for me (I love it!). I can't wait to sport my new dapper, duct tape bow tie next Thursday! Try not to be too jealous...


Pretend this drawing dummy is me...wearing my bow tie...doing a heel click! Haha, enjoy!  I know I will!

Wednesday, September 19, 2012

Artsonia's Artist of the Week

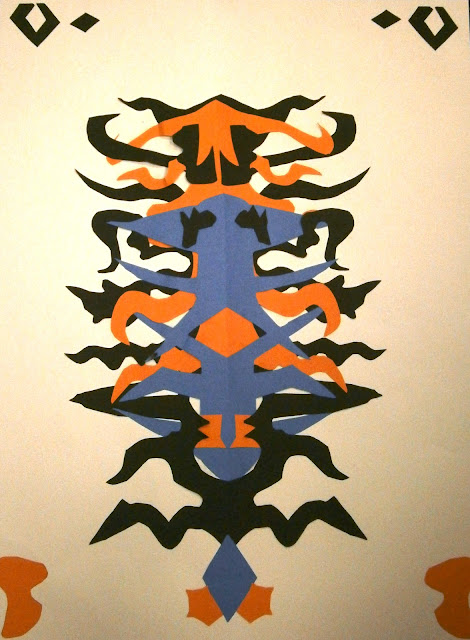
Such great and exciting news!  One of my 6th graders has been selected by Artsonia.com as a contestand for the Artist of the Week!  See the email I recieved and link below to vote for Zach and his Cut Paper Symmetry! 

Dear Valerie,

 Great News!  Zach4528, from Ballard Middle School, has been selected as a finalist for this week's "Artist of the Week" award for the 4th-6th age group.  The finalist who receives the most online votes between now and Saturday September 22 will be selected as our "Artist of the Week." 

To view the finalists and cast your vote, simply click on the link below.  Voting is limited to one vote per computer per day for each age group!


The "Artist of the Week" will be featured on the Artsonia homepage and will receive a commemorative plaque from Artsonia.  In addition, Blick Art Materials has generously donated $100 gift certificates to the winning teachers and $50 to the winning artists.
 

All fan club members from Ballard Middle School have just been sent an email inviting them to vote, but we encourage you to personally spread the word at school, making sure all your students cast their votes right away!
 

Thank you for submitting your artwork to Artsonia and helping every child be an artist!

 
Sincerely,

Your friends at Artsonia

Zach's Nominated Artwork
 

Wednesday, September 12, 2012

Digital Photography Picture Taking Assignment

Tips and Tricks to Great Photography

Students enlist the Tips and Tricks in their own photography

My 7th and 8th grade Digital Photography class just completed their first picture taking assignments!  After spending time on editing, composition and camera handling, I finally let them loose!  I armed my students with a camera, a photo log (chart to write down what they took pictures of, when and where) and took them down the road to a conveniently located park.  I asked that the students take photos for the following categories: Portrait, Landscape, Action, Abstract, Candid, Free Choice from a Unique Angle and a Macro Image.  I couldn't have been more pleased with their results!  So it's only natural that I post a few of my faves
Tips and Tricks to Great Digital Photography Art Lesson Plan Unique Angles Example


Tips and Tricks to Great Digital Photography Art Lesson Plan


 Tips and Tricks to Great Digital Photography Art Lesson Plan


Tips and Tricks to Great Digital Photography Art Lesson Plan Simplify Example


Tips and Tricks to Great Digital Photography Art Lesson Plan Leading Lines Example

Thursday, September 6, 2012

Cut Paper Symmetry

Cut Paper Symmetry

Students use Contrasting Colors to create a Symmetrical Design

I teach my students about the Elements of Art and Principles of Design through a series of lessons and projects which incorporate these key fundamentals.  I've started the 6th graders off with a project revolving around symmetry while incoporating line, balance (symmetry and asymmetry), shape and space (positive and negative as well as overlapping).  We discussed positive and negative space quite extensively during this project while focusing on making symmetrical shapes and creating symmetrical designs with the possibility for some asymmetrical touches. 

I love this lesson to start with because each student feels successful and strong in their artmaking through these simple tactics.  They have a lot of fun looking for shapes and figures within their cuts too!  My favorite so far is a student looking at the "bonus shapes" that I have as examples on my board (pictured below).  He told me "This black piece looks like a water buffalo and the two blue ones around the top of it look like lizards!"  I would have never seen the water buffalo and lizard trio!  They have such great imaginations, I love it!!!


 After students cut out all their shapes and have a good pile of "bonus shapes" I ask that they experiment with their layout before we glue antyhing. We review contrast, color distribution, how to use space and (of course) symmetry. They have a lot of fun coming up with their layouts and how they want things to overlap and sometimes weave together. They get really proud of their work (something I'm always eager to see!) and like to show off each idea to their classmates, it's a lot of fun to see how many different ideas they have.

Cut Paper Symmetry Art Lesson Plan with Color Contrast

When the students finished their work, I took a digital photo of each piece and uploaded it for parent access on Artsonia.com.  Check out our Cut Paper Symmetry Exhibit here

Friday, August 24, 2012

Digital Photo Editing

Digital Editing Skills

Students Learn and Practice Basic Editing Skills

I have the great benefit of teaching 7th and 8th graders a Digital Photography/Technology course.  I don't currently have the option of teaching them Photoshop because of the software provided so I have been focusing on teaching them how to use Microsoft Office and www.pixlr.com/editor.  The benefit to these programs is that many of them have Microsoft Office on their computers at home and pixlr is a free online editing program.  I found a great link to download Paint.net, another editing program, from and it also provided photos for the kids to practice on.  Follow this link to get them yourself: Photo Editing with Practice Images

Before we practiced editing, we talked about what makes a good photo.  This is my PowerPoint that I use to teach this Tips and Tricks PowerPoint

We have also been learning how to adjust red eye, brightness, contrast and other basic editing skills.  Here are some of the photos (from the site above) that the kids have cropping and one example of the cropped version:


The students are each assigned a computer and do their own editing.  I ask that after each assignment, they save and submit their work to me through our school's network drive.  They can just drag their work from their desktop to my "Hand In" folder in which they have each created their own subfolder named after themselves.  It is a great tool to have in a technology class, so the kids are becoming familiar with how to submit things through the computer system instead of printing hard copies of each assignment.  This is especially great for saving ink when we are just practicing simple skills like cropping and red eye removal!


Wednesday, August 22, 2012

Portfolios

Portfolios

Students create storage for their artwork

One of the courses I teach is a general 6th grade art exploratory.  I teach three sections of this on a three day rotation (I only see one 6th grade class each day) so after we got our syllabus, rules and beginning of the year activity out of the way I started the kids off with portfolios.  I think it is important for my students to have a place to store their artwork whether it is in progress or complete.  It helps keep them  organized (not to mention, my classroom organized too!)and it teaches them responsibility and ownership.  It their responsibility to come to class, find their portfolio and get out whatever we may be working on.  I also find it helpful to build the portfolio with them so that they get used to taking directions, watching demonstrations and working independently all in the same project.  I ask that their names be large and legible on their portfolios and that they create a decorative border.  They only have one class period to make and decorate their portfolio so it also teaches them to spend their time wisely.  Some students get further than others and so I always let them know if they finish another project early they can continute their design on the portfolio.
Student Made Paper Portfolios Art Lesson Plan

Thursday, August 16, 2012

New School, New Classes, New Students!

This is my sixth year teaching art and I just got a new classroom!  Lucky for me, I love change because this year there has been plenty of it!  I recently started my new job at Ballard Middle School in Huxley, Iowa and I believe it is going to be a wonderful year in my art room! I'm teaching  6th grade art and 7th and 8th grade Digital Photo/Technology and couldn't be more excited! 

To clear up any first day jitters I played a little game with my students (which I can't disclose here because it involves some mystery and I don't want my future students to already have the inside scoop!  But if your curiousity is killing you, message me and I'll fill you in!) and go over rules/expectations.  I also ask that my students fill out a brief survey so that I know where they are with experience and skill level to help guide my instruction throughout the year.  The kids have been great and I'm really looking forward to getting my nice, clean room filthy with art making!  Enjoy the clean room and empty shelf photos while they last because they won't last long!


Side note: Feel free to use any of my resources!