Thursday, October 25, 2012

Ancient Egyptian Mummy Tales

Mummy Tales

Students Write a Biography to go with their Mummy Form

After the Sixth Graders accessorized their mummies, they wrote short stories about them.  Their basic requirement was to give a brief bio describing who the mummy was, what they were interested in and how they died (all while making sense with their accessorized mummy) as they incorporate an Egyptian reference or two.  I am constantly wowed by what they come up with, such creative minds!
Egyptian Mummy Art Lesson Plan with Writing
This particular mummy is accesorized with a monocle, bow tie and cane so his story was about being young and wealthy before dying at the clutches of a crocodile in the Nile River.

Here is another one of my favorites.  Her story was about Mummy Jordan (a bandage filled homage to Michael Jordan).  She even made a free standing basketball hoop and a ball out of a pom pom!
Egyptian Mummy Making Art Lesson Plan


Wednesday, October 24, 2012

Ancient Egyptian Mummies

Ancient Egyptian Mummies 

Students Create Mummy Forms with Modern Accessories

The Sixth Grade Social Studies teachers are currently covering Egypt and I jumped at the chance to introduce them to various Ancient Egyptian arts.  We started off discussing mummification and the steps and reasoning behind it.  The students loved taking this opportunity to share what they already know about mummies, tombs and Egypt in general (they especially like talking about how Egyptians removed a person's brain when they were to be mummified!).  We then set to make our own mummies with a modern twist.  We build foil body forms and wraped them in muslin that we cut into bandages and dyed various shades of brown with tea.  I got this idea from the Boise Art Museum where they had their own step by step process.  I used my own variation of this lesson, but the basic steps were the same. 
Egyptian Sculpture of Mummy Forms Art Lesson Plan

Step One: Build a Mummy Form from Tin Foil.  Some students used masking tape to hold parts together, others were able to use foil to hold form together

Step Two: (After cutting and tea-dyeing  the bandages) Wrap Mummy with various strips of fabric.  Add some school glue to the ends to keep wrap in place.

But as an art teacher, I couldn't just let our mummies all look the same tea-dyed brown, so for Step Three: we added personality to our mummies by creating accessories! Each student used mixed media to construct whatever accessories they felt necessary to make their mummy stand out. A lot of students made simple accessories like headphones and hats, and others constructed guitars and parachutes for their mummies. The creative juices were flowing and we had some great results. Here are a few of the finished mummies (these all happen to be musically themed, but there are quite a few other styles amongst the students). I'll be sure to post more photos as the kids finish up adding their details.
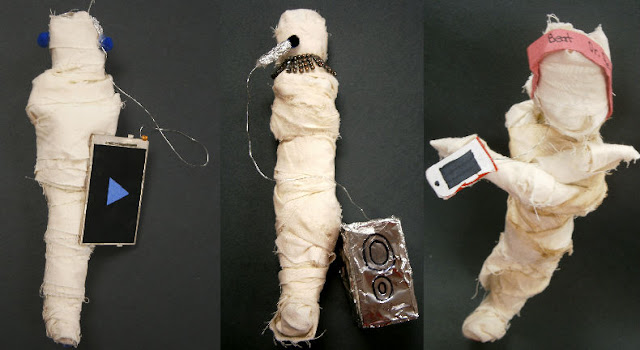
Mummy Sculpture Forms with Modern Accessories Art Lesson Plan

Tea Dye Troubleshooting: The mummies in the photos above are a lot lighter in color than the one pictured for "Step Two."  That is because I am new to tea dyeing and the class who made these mummies did not leave their bandages in the tea long enough.  I found that I needed to use many more tea bags to get the color right on this particular fabric and the bandages need to soak for a few days in order to really get that antique coloring.

Friday, October 12, 2012

Op Art

Optical Illusions

Students Make Op Art using Rulers, Compasses and Marker

I like to start my students off with projects that refresh them on basic motor skills as well as introducing them to the Elements and Principles of Art and Design.  Our current project focuses on the use of a ruler and a compass to give the illusion of depth and form through the use of space and perspective.  In short, we're creating our own Optical Illusions (or Op Art, if you will). 


We started off by talking about space and perspective and how you can tell if something is in the foreground, middleground or background in two-dimensional artwork. We talked mainly about size, shading and location of objects in the frame. Then we set to give our own illusion of form (something three-dimensional) through the use of sizing, spacing and varying angles and curve of line. We worked together to create a one point perspective drawing in a manner that we would still be able to achieve our Op Art style.  The students chose whether they wanted to color them in with marker or colored pencil and started by coloring their background (pictured above).  We then worked on coloring our "forms" or "globes/spheres" to keep with the illusion.  For a quickly drawn step by step tutorial of how we draw them, click here.
As you can see below, the result is mesmerizing!
Drawing Optical Illusions Lesson Plan

Friday, September 28, 2012

Bring On The Bow Ties!

Our school celebrates every Thursday as "Bow Tie Thursday" where students and staff alike are asked to come sporting a bow tie. Quite a few students and staff have been known to go all out with their attire and I couldn't help but notice a few particularly appealing duct tape bow ties! One student in particular has been fashioning them out of various duct tape prints (who knew there was such a variety of styles and colors of duct tape) and I was fortunate enough to recieve my first duct tape bow tie. She even chose a 'splatter paint' themed duct tape for me (I love it!). I can't wait to sport my new dapper, duct tape bow tie next Thursday! Try not to be too jealous...


Pretend this drawing dummy is me...wearing my bow tie...doing a heel click! Haha, enjoy!  I know I will!

Wednesday, September 19, 2012

Artsonia's Artist of the Week

Such great and exciting news!  One of my 6th graders has been selected by Artsonia.com as a contestand for the Artist of the Week!  See the email I recieved and link below to vote for Zach and his Cut Paper Symmetry! 

Dear Valerie,

 Great News!  Zach4528, from Ballard Middle School, has been selected as a finalist for this week's "Artist of the Week" award for the 4th-6th age group.  The finalist who receives the most online votes between now and Saturday September 22 will be selected as our "Artist of the Week." 

To view the finalists and cast your vote, simply click on the link below.  Voting is limited to one vote per computer per day for each age group!


The "Artist of the Week" will be featured on the Artsonia homepage and will receive a commemorative plaque from Artsonia.  In addition, Blick Art Materials has generously donated $100 gift certificates to the winning teachers and $50 to the winning artists.
 

All fan club members from Ballard Middle School have just been sent an email inviting them to vote, but we encourage you to personally spread the word at school, making sure all your students cast their votes right away!
 

Thank you for submitting your artwork to Artsonia and helping every child be an artist!

 
Sincerely,

Your friends at Artsonia

Zach's Nominated Artwork
 

Wednesday, September 12, 2012

Digital Photography Picture Taking Assignment

Tips and Tricks to Great Photography

Students enlist the Tips and Tricks in their own photography

My 7th and 8th grade Digital Photography class just completed their first picture taking assignments!  After spending time on editing, composition and camera handling, I finally let them loose!  I armed my students with a camera, a photo log (chart to write down what they took pictures of, when and where) and took them down the road to a conveniently located park.  I asked that the students take photos for the following categories: Portrait, Landscape, Action, Abstract, Candid, Free Choice from a Unique Angle and a Macro Image.  I couldn't have been more pleased with their results!  So it's only natural that I post a few of my faves
Tips and Tricks to Great Digital Photography Art Lesson Plan Unique Angles Example


Tips and Tricks to Great Digital Photography Art Lesson Plan


 Tips and Tricks to Great Digital Photography Art Lesson Plan


Tips and Tricks to Great Digital Photography Art Lesson Plan Simplify Example


Tips and Tricks to Great Digital Photography Art Lesson Plan Leading Lines Example

Thursday, September 6, 2012

Cut Paper Symmetry

Cut Paper Symmetry

Students use Contrasting Colors to create a Symmetrical Design

I teach my students about the Elements of Art and Principles of Design through a series of lessons and projects which incorporate these key fundamentals.  I've started the 6th graders off with a project revolving around symmetry while incoporating line, balance (symmetry and asymmetry), shape and space (positive and negative as well as overlapping).  We discussed positive and negative space quite extensively during this project while focusing on making symmetrical shapes and creating symmetrical designs with the possibility for some asymmetrical touches. 

I love this lesson to start with because each student feels successful and strong in their artmaking through these simple tactics.  They have a lot of fun looking for shapes and figures within their cuts too!  My favorite so far is a student looking at the "bonus shapes" that I have as examples on my board (pictured below).  He told me "This black piece looks like a water buffalo and the two blue ones around the top of it look like lizards!"  I would have never seen the water buffalo and lizard trio!  They have such great imaginations, I love it!!!


 After students cut out all their shapes and have a good pile of "bonus shapes" I ask that they experiment with their layout before we glue antyhing. We review contrast, color distribution, how to use space and (of course) symmetry. They have a lot of fun coming up with their layouts and how they want things to overlap and sometimes weave together. They get really proud of their work (something I'm always eager to see!) and like to show off each idea to their classmates, it's a lot of fun to see how many different ideas they have.

Cut Paper Symmetry Art Lesson Plan with Color Contrast

When the students finished their work, I took a digital photo of each piece and uploaded it for parent access on Artsonia.com.  Check out our Cut Paper Symmetry Exhibit here