Pop Art Portraits
Andy Warhol Inspired Photo Transfers
 |
| My Finished Portrait |
We started by looking at a PowerPoint I've created about Pop Art and Andy Warhol. We discussed the characteristics of his artwork (focusing on portraits). Since we just finished paint mixing, after awhile I began to focus the discussion on colors he liked to work with and pair together and was able to have a good conversation with the students about contrast and types of colors (tints, shades, primary, secondary, intermediate, etc). Then the fun began!
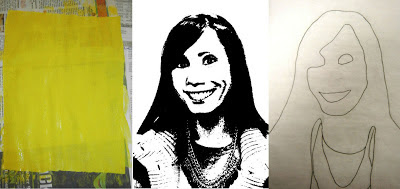
We started by taking photos. I had each student stand infront of my white projector screen one at a time and pose however they wished. Some students smiled, some made faces and others prefered their very own mug shot! In my spare time, I posterized their photos using www.pixlr.com/editor and printed them as 8x10 images (on plain printer paper). Below is the example of me and the first 3 steps:
The students each got an 8x10 sheet of fabric and painted it a color of their choice. This would be their background. While the paint dried, they took their 8x10 photo of themselves and a sheet of tracing paper to trace the basic shapes of their face and/or clothing. I urged them to press hard with their pencil and only trace major shapes that they would like to paint a second color. I also encouraged them to trace shapes that they would want to match the same color as their background. Every now and again a few students find this step confusing, I reassure them that there is not a right nor wrong way to do it and in the end, they all do a great job!
When the paintings were dry, we layed the tracing paper face down (pencil side down) onto the fabric and re-traced their tracing, but from the back side of the paper. The students were amazed to find that this pressed their pencil from one side of the tracing paper onto their fabric. I reassured them that their portrait should look "backwards." We took our pencils directly onto the fabric to make the outlines stand out more.
The students used their new outlines to paint their second color. I requested that they use a color that would be considered fairly high contrast to their first color. As the paintings dried, we trimmed away the extra paper on our photographs.
When they were dry, we covered our fabric with gloss gel medium. To spare my brushes I had the students spread the gel over their entire sheet of fabric using their finger. For the squeamish, I offered disposable gloves. We then pressed our photo directly (and firmly) into the gel and allowed them to dry.
We used sponges and water to go directly over our paper so that it would begin to peel away. After removing all of the remaining pulp, we had our image transfer and pop portraits!


No comments:
Post a Comment
Note: Only a member of this blog may post a comment.